Eclipse 3.1 - New and Noteworthy

We've come a long way since Eclipse 3.0 shipped (June 25, 2004). Thanks to the boundless energy of the Eclipse community, the Eclipse 3.1 release is finally ready. Here are some of the more noteworthy things available in the Eclipse 3.1 release now available for download from the eclipse.org downloads page.

Platform


Significant Performance Enhancements

Performance has been significantly enhanced across the board since the 3.0 release.

We have also added debugging support that can continually monitor performance while the workbench is running, and have made pervasive benchmarking tests part of the standard test suites. The results of these tests are linked off of the download page for each build. Here is an example of (part of) the output:
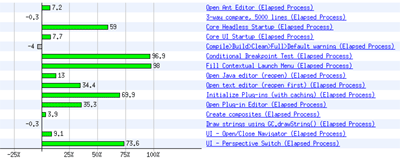
Example performance graph


Support for bi-directional text

Support for bi-directional languages (BIDI), has been extended across the platform. Window layout orientation can be configured from the command line, and a suitable default orientation is inferred from the locale. Note that SWT fully supports BIDI on Windows only.
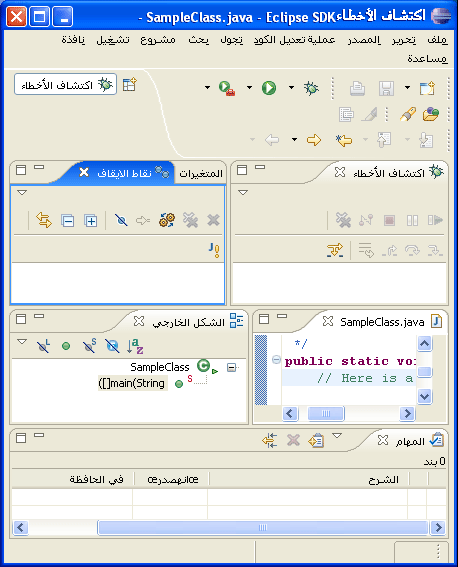
Screenshot of mirrored Eclipse perspective


Improved preferences and properties support

You should find preferences and properties significantly easier to work with because of enhancements such as these:

  • The Preferences and Properties dialogs now have a field for filtering the pages displayed to just those that have names or keywords that match the specified prefix. The example below shows matches for the keyword "tab".

    Screenshot of new preferences dialog

  • Preference pages with related settings are linked together and provide web-style forward and backward buttons (see the screenshot for the next item).
  • You now can also navigate to preferences in context. For example, in the editor context menu there is a Preferences... item that shows you the preferences that apply to the current editor.
  • The Import/Export wizards now support preferences. You can choose to import or export all changed settings, or only specific preferences where supported.
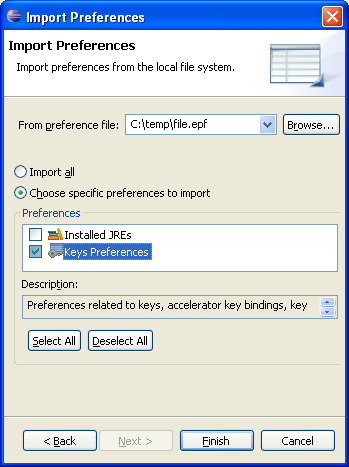
    Screen shot of preferences being imported


Editor lookup based on content type

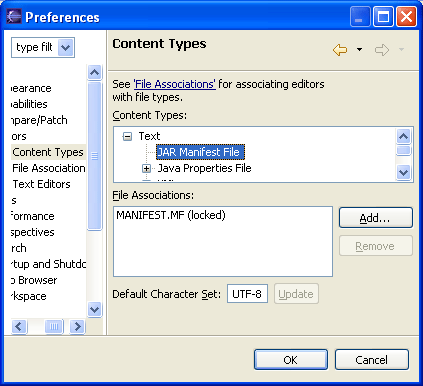
When determining the appropriate editor to open for a given file, the file's content type is now taken into account. Editors may now advertise that they are capable of working on certain content types as well as their traditional file name and extensions. A preference page to edit content types and their associated file names and character sets has been added under the General/Editors preference page.

Screenshot of content type dialog


Importing multiple projects

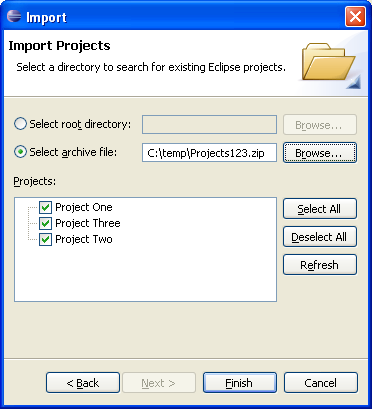
The Import > Existing Project into Workspace command now allows you to search for all projects under a specified location and import any projects found in one go. You can now also import existing projects from TAR and ZIP archive files.

Screenshot of new import wizard


Line delimiter support

You can now set the line delimiter that is used when creating new text files. You can provide a single setting for the entire workspace, or for a given project.
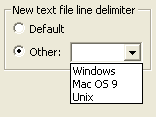
Screenshot of default delimiter dialog

In addition, line delimiter conversions can now be applied to projects, folders, and files, not just to the contents of a single editor.
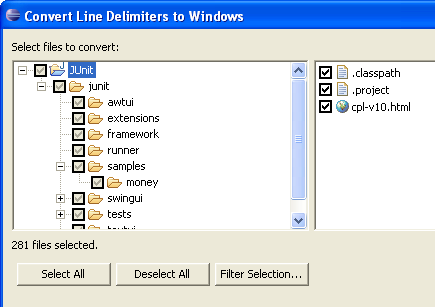
Screenshot of conversion dialog


Single JAR plug-ins

Eclipse now provides the ability to ship a plug-in packaged as a single JAR file rather than as a directory of files. Think of this as folding the plug-in metadata (plugin.xml etc.) into its code JAR. This move has a number of benefits ranging from smaller footprint to easier/faster install to fitting better with the standard Java notion of JARs.

In Eclipse 3.1 most plug-ins are shipped as JARs in all distributions. This format is the new best practice for Eclipse packaging.
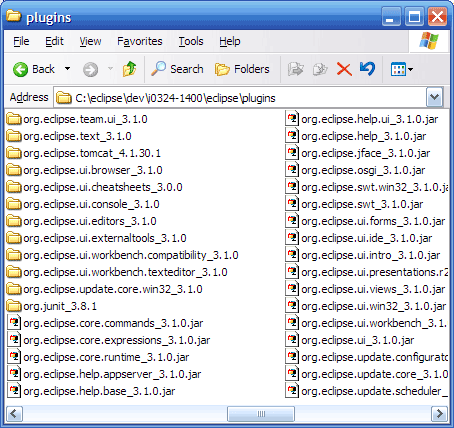
Screenshot showing JAR'ed plugins


New Editor Features

There have been a significant number of improvements made to the Eclipse editors, including:
  • Hyperlink support, which was restricted to the Java editor, has been generalized and moved down to Platform Text. URL hyperlinking now works in the standard Text editor:

    Picture of hyperlinking in Text editor

  • Text editors now support word completion. In text editors you can complete a prefix to a word occurring in any of the currently open editors or buffers. The default key binding for word completion is Alt+/ (Ctrl+. on the Mac).
  • You can now open a text editor without creating a file first. Simply go to File > New > Untitled Text File.
  • Many commands that were only available in other views are now right at your finger tips in the editor context menu. For example, you can commit files to CVS or run and debug Java programs and Ant builds from the editor's context menu.
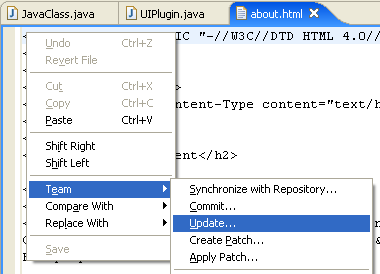
    Screenshot showing team contributions on Editor menu

  • You can now have more than one editor open on the same file. Use Window > New Editor to open a second editor of the same type.
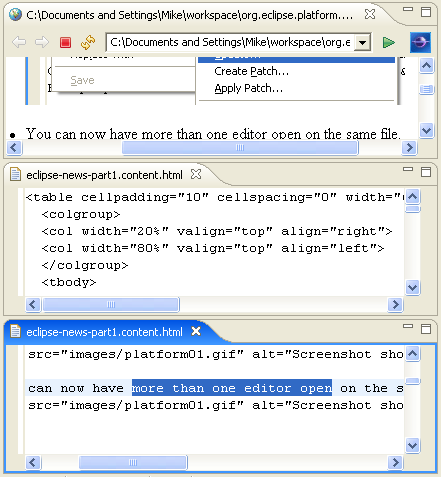
    Screenshot showing multiple editors


View all keyboard shortcuts

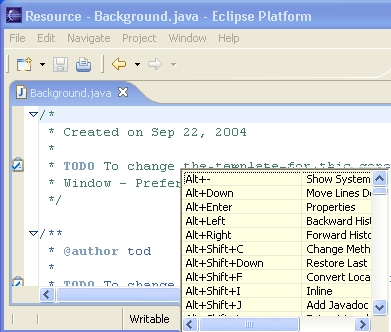
While working with your favorite editors and views in Eclipse, just press Ctrl+Shift+L to see a full list of the currently available key bindings. This is a great way to learn what is available in the UI and to speed up your productivity by learning more key bindings. This information is also available in the improved General > Keys preference page.

Screenshot of keybindings


Welcome launch bar

When the 'Go to the Workbench' link is selected in the Eclipse SDK Welcome page, the entire page is collapsed into a new Welcome launch bar, which appears in the lower left Workbench window trim area by default. The Welcome launch bar allows new users to quickly restore the last Welcome page, or jump to one of the main pages using the shortcuts.

Screenshot of Welcome launch bar


New Help view

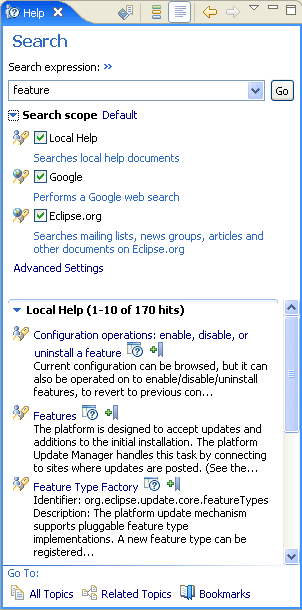
Help has been brought closer to where you work with the introduction of the Help view. It contains various pages that provide assistance when you need it. If you press F1, the view will open with the topics related to what you are working on at the moment. You can also switch to All Topics and see what else is there in the local help. The new documentation search spanning local help, remote InfoCenters, Eclipse.org, and the web is now directly accessible from the Help menu (via Help > Search Help).

Screenshot of new help view


Downloading of updates in background

The Update Manager's install wizard (Help > Software Updates > Find and Install) now allows downloading of plug-ins in the background. This way you can continue working while plug-ins are being downloaded. Once everything is downloaded, the install phase (unzipping the jar files and moving them to the installation directory) is still controlled by a modal dialog.

Update site mirrors

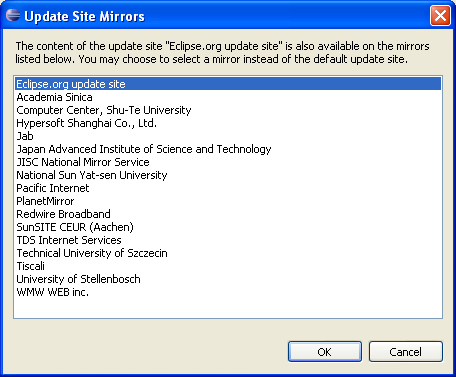
Update sites can now specify a list of servers that mirror their content. As features are looked up on a mirrored update site, you're prompted to pick any of the available mirrors.

Screenshot showing mirrors


Improved handling of feature dependencies
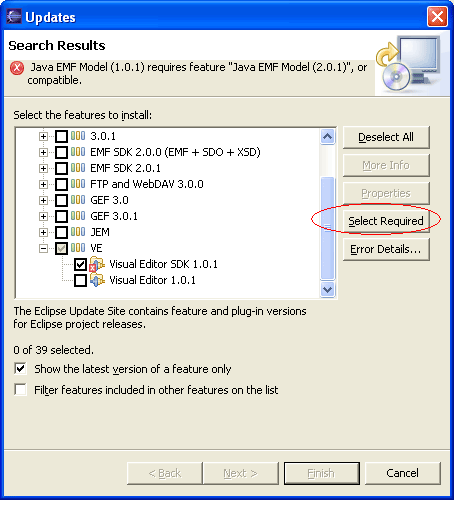
When installing a feature that depends on other features, the install wizard lets you automatically include all available dependencies. Press the Select Required button to include all prerequisites of the selected features, and then Install All to complete the install.

Screenshot of Select Required button


RCP delta pack

A new RCP delta pack is now available (it's listed under the RCP SDK section of the download page). It contains all the OS-specific fragments of the RCP plug-ins, and is aimed at RCP developers that need to create a family of downloads of their application for different OS's. It beats having to download all the OS-specific RCP binary drops.

SWT Browser widget improvements

Many improvements have been made to the SWT Browser widget. Highlights include:

  • On Windows, new windows can now be opened in a stand-alone Internet Explorer browser.
  • On Linux, the browser now works with Mozilla 1.7 GTK2 as well as with Mozilla 1.4 GTK2 and above.
  • A new execute method passes an arbitrary string of JavaScript commands to be directly evaluated by the underlying native JavaScript engine (Internet Explorer on Windows, Mozilla on Linux, Safari on the Mac) in the context of the HTML document that is currently loaded in the browser widget.

Screenshot of embedded browser view

The new Browser Demo example (shown above) illustrates how to integrate HTML content with the SWT Browser widget into an application. The easy way to get the SWT samples is via the new Welcome page.


New spinner widget

SWT now provides a spinner widget on all window systems. See org.eclipse.swt.widgets.Spinner.

Screenshot of SWT spinner widgets


GC.setLineCap, GC.setLineJoin

GC.setLineCap lets you control how the end of a line should be drawn (flat, round, or square styles as shown in the top line of the figure below). GC.setLineJoin allows you to control how one line attaches to another one in methods like GC.drawPolylines or GC.drawPolygon. Join styles are bevel, round, and miter (bottom row)

Screenshot showing new SWT line styles

See the SWT snippet for drawing lines with different cap and join styles.


More platforms being built

In addition to our reference platforms, which are thoroughly tested and supported, there are additional platforms being built and made available on the download site. Currently, these include Solaris/SPARC/GTK and Linux/PPC/GTK. These additional platforms have received only sporadic testing, and thus are not yet officially supported.

Selection clipboard

Unix users on both GTK and Motif can now select text and paste it with the middle mouse button.

Native tree with columns

The SWT Tree widget can now display multiple columns. New API in Tree, TreeItem, and TreeColumn provides the same support for columns as Table. This obsoletes the TableTree widget, which is now deprecated.
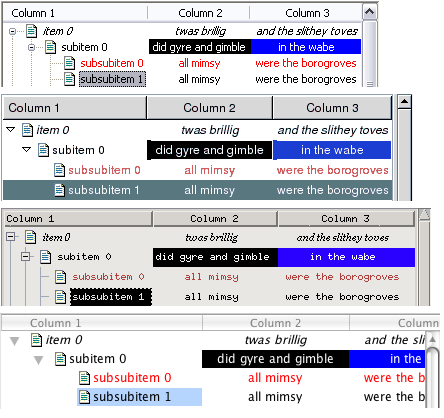
Screenshot of multi-column Tree

For more details see the example snippet.


Reorderable table columns

The display order of columns in a table can be changed by dragging the column header (as well as being set programmatically).
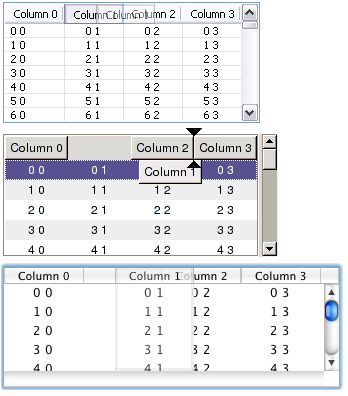
Screenshot of Table column being moved

For more details see the example snippet.


Standalone SWT download is now an Eclipse project

For developers of standalone SWT applications, the SWT component is available as a separate download. For Eclipse 3.1, the SWT download can now be easily imported into your workspace as a project.

  1. Download SWT for standalone applications. A standalone version of SWT is available on the same download page as the Eclipse SDK. Look for the section titled SWT Binary and Source. Do not extract the archive file, just save it to disk.
  2. Select Import... from the File menu.
  3. Select Existing Projects into Workspace and click on the Next button.
  4. Select Select archive file: and use the Browse button to locate the SWT standalone archive you have previously downloaded.
  5. Click on the Finish button.

The org.eclipse.swt project you have imported defines the location of the native libraries so you can run your application with the standard Java or JUnit launchers.


Starting SWT standalone applications using PDE

To run and debug your SWT application using the SWT plug-in from Eclipse, you can use the new SWT application launcher to locate the native libraries. A shortcut to the launcher is available in the context menu of your Java class via Run As > SWT Application.

Screenshot of SWT application launching


Advanced graphics

New API has been added for advanced graphics operations such as path for curves and lines, alpha blending and transformations. This new API requires the Cairo Vector engine on GTK and Motif, and GDI+ on Windows.
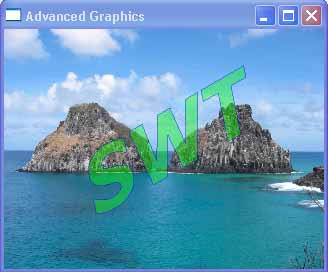
Screenshot showing advanced GC features in use

For more details see the example snippet.


New Link widget

The new Link widget displays text containing hyperlinks.

Screenshot of new link widget

For more details, see the example snippet.


Strike through and underline in StyledText

Text can be underlined or a strike can be drawn through it with the new StyleRange.underline and StyleRange.strikeout fields.
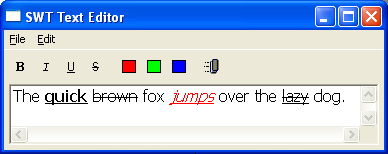
Screenshot showing new SWT text styles

For more details see the example snippet.


CVS outgoing change sets

Outgoing change sets allow you to organize outgoing changes into logical groups before they are committed. To enable outgoing change sets, put the Synchronize view into Outgoing mode, click on the change set button in the Synchronize View, then select an outgoing change and choose Add To > New Change Set... from the context menu. You can also appoint a change set as the default and have all subsequent outgoing changes added to that set automatically. Commands on the context menu allow outgoing changes to be moved between change sets. When the change set is committed to the CVS repository, the comment associated with the change set is used as the CVS commit comment.
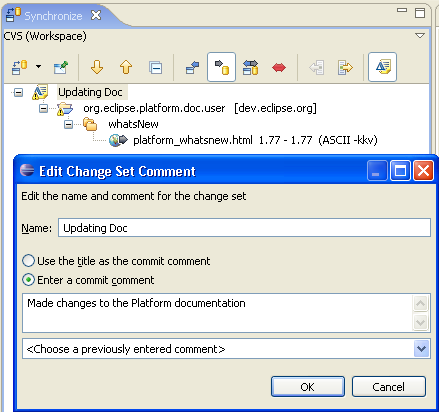
Screenshot of outgoing change sets


Support for CVSNT
Thanks to the efforts of the CVSNT developers, the Eclipse CVS client now supports CVSNT. CVSNT versions greater than 2.0.58b have been tested with Eclipse 3.1.

CVS commit review

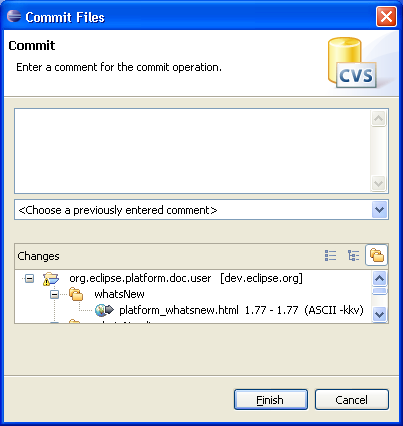
The commit dialog now includes a list of the files that are being committed. This makes it easy to browse the files while writing the commit comment, and to hold back certain files by removing them from the list. It's especially useful when committing directly from the Package Explorer or Navigator view.

Screenshot of commit review

There are also CVS preferences (Team > CVS) for determining whether commit comments are mandatory and for specifying the maximum number of files that should be displayed when committing.


CVS improved file type support
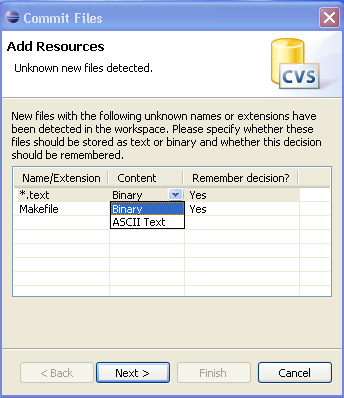
CVS now prompts whenever a file with an unknown file type is about to be committed. This allows you to explicitly configure a file type instead of CVS picking binary as the default. Also, file type decisions can now be based on the file name alone (e.g. Makefile), not just the file extension.

Screenshot of file type support


CVS branch and merge
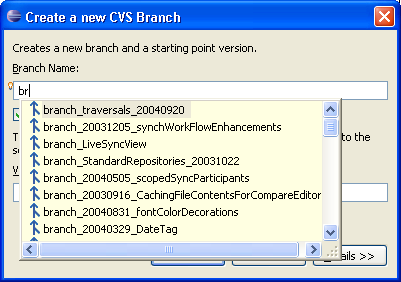
The CVS branch wizard now lets you use content assist to pick a branch from a project already branched in your workspace.

Screenshot of branching

When merging you can simply specify the end tag and the wizard will automatically find the appropriate start tag. If a start tag is not available, you can still merge without seeing a preview in the Synchronize view.


Ant debugger
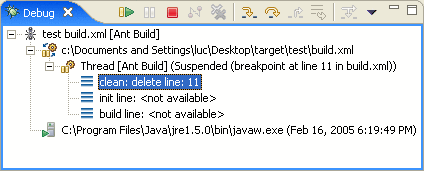
The new Ant debugger helps you debug the execution of your Ant buildfiles. It includes the standard debugger features like breakpoints, stepping, dependency call stack, and run-to-line support.

Ant dependency call stack

The presentation of Ant properties are also grouped in the Variables view for your convenience:
  • System: Ant properties set from the System for the the build
  • User: properties such as those set using the -D option
  • Runtime: all properties set during the execution of the build

Ant editor improvements

Several improvements have been made to the Ant Editor, including:
  • Support for folding of build file regions. Hovering over a folded Ant element lets you peek at the hidden code. You can quickly control folding presentation of a buildfile from the editor ruler menu (see screenshot below).
  • Renaming occurrences of properties and targets within the same buildfile. To activate this use the editor context menu or the Alt+Shift+R keyboard shortcut when the cursor is located within the occurrence to rename.
  • Navigating to the referenced target or property via Navigate > Open declaration (F3).
  • Opening a browser on the relevant page in the Ant manual by placing your cursor on the name of an Ant task, type, etc. and pressing Shift+F2.
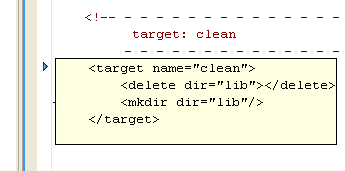
Screenshot of code folding in the Ant editor


Ant target per build kind

The Targets tab for an Ant builder allows you to specify the target(s) that should be executed for each build kind. This includes the target to execute when you invoke a "Clean".
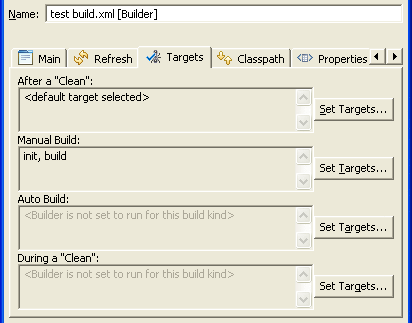
Targets tab


New features for the Console

Significant improvements have been made to the Console view
  • In the Console view you can signal end-of-file to a program waiting for input by pressing Ctrl+Z on Windows (Ctrl+D on Linux).
  • You can configure the console to display output using a character encoding different from the default using the Console Encoding settings on the Common tab of a launch configuration.
  • Your program's output can now be captured in a file in addition to being written to the console. The behavior is controlled by settings found on the Common tab of launch configurations.
  • If you find you need to see multiple consoles at once, you can now open additional Console views via the New Console View command found on the Open Console drop-down menu in the Console view.
JDT


J2SE 5.0

Eclipse 3.1 includes full support for the new features of J2SE 5.0. This support is both pervasive and powerful -- everything that you expect to work with J2SE 1.4, including editing, code assist, compiling, debugging, quick fixes, refactorings, source actions, searching, etc. will work seamlessly with (and has been extended to support the new capabilities of) J2SE 5.0's new types and syntax.

Here are some examples:

  • Quick Fix to update JRE and compiler compliance to 5.0
  • New Type wizards support generics
  • Enumeration and Annotation wizards
  • Semantic coloring of J2SE 5.0 constructs in Java editors
  • Rename refactorings handle renaming of type parameters
  • Infer Generic Type Arguments refactoring
  • Quick fixes for Generics
  • Search result filters for reference search for parameterized types
  • Code completion for annotations
  • @SuppressWarnings annotation support
  • optional diagnoses for issues such as incomplete enum switches and boxing/unboxing conversions
  • Quick Fix to create enum constants
  • Autoboxing parameter proposals
  • Quick Assist to convert for-loops over arrays and collections to J2SE 5.0 enhanced for-loops
  • Support for package-info.java

Please check out the Java Development User Guide help book (available from the Help > Help Contents menu) for more details on the many new J2SE 5.0 specific features that have been added.

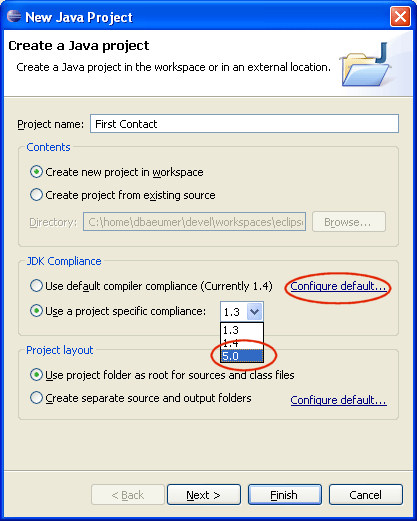
In order to develop code compliant with J2SE 5.0, you will need a 5.0 Java Runtime Environment (JRE). If you start Eclipse for the first time using a 5.0 JRE, then it will use it by default. Otherwise, you will need to use the Installed JREs dialog to register one with Eclipse. You can reach this dialog either via the preference Java > Installed JREs or by following the Configure default... link on the New Java Project wizard.

New Java Project wizard


New Javadoc
compiler settings

When Javadoc checking is enabled, you can configure it to
  • warn when @see and @link tags reference deprecated elements
  • warn when @see and @link tags reference elements that are not visible

The settings are on the Java > Compiler > Javadoc preference page.


Serial Version UID

There is a new optional compiler diagnosis for serializable classes missing a declaration of a serialVersionUID field.

The preference setting can be found at Java > Compiler > Errors/Warnings > Potential programming problems


Early detection of references to internal classes

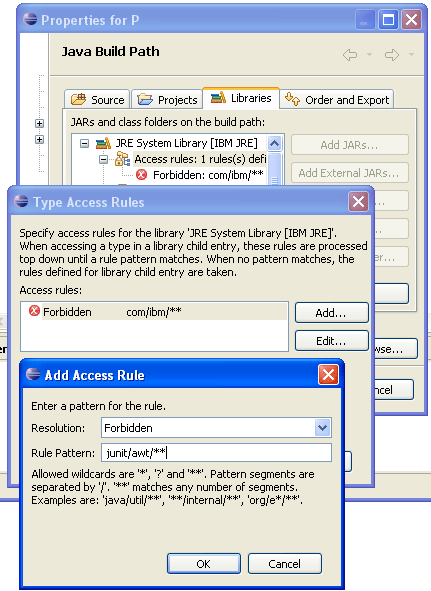
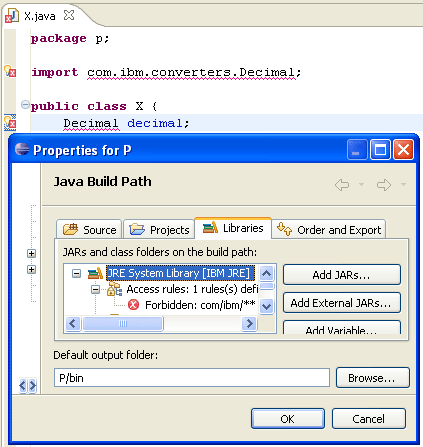
You can annotate library (and project) entries on the Java build path (Properties > Java Build Path > Libraries) to identify any internal packages that you want to avoid referencing directly from your code. For example, it's generally a bad idea to depend on any of the vendor-specific packages, like com.ibm.* or com.sun.*, commonly found in the J2SE libraries. Access restrictions are expressed with a combination of inclusion and exclusion rules on build path entries. The pattern syntax follows Ant fileset notation, and matches against the path to the class file. For example, using the pattern com/ibm/** as an exclusion rule would restrict access to all classes in the com.ibm package and its subpackages; using the pattern org/eclipse/**/internal/** as an exclusion rule would catch all classes to internal Eclipse packages. When you provide inclusion rules, everything matched by these rules is ok, and everything else is considered out of bounds.

The Java > Compiler > Errors/Warnings > Deprecated and restricted API preference setting lets you control whether errant references are flagged as errors or warnings (they are errors by default for forbidden reference and warnings for discouraged references).

picture of Java Build Path properties dialog


Access rules on libraries and projects

Access rules can be defined on referenced libraries and projects to explicitly allow/disallow/discourage access to specific types.

picture of Build path wizard with access rules


Mark occurrences of inherited methods

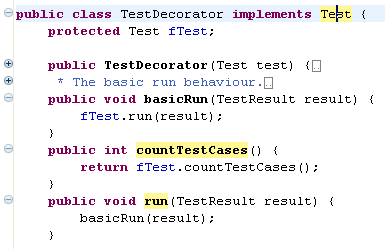
The Java editor can highlight all method declarations that implement or override methods inherited from the selected supertype. See the Java > Editor > Mark Occurrences > Method implementing an interface preference setting.

Picture of mark Implement occurrences


Highlighting of deprecated class members in the Java editor

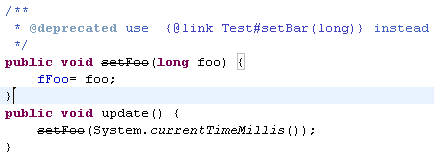
Deprecated class members are marked by advanced highlighting:

Highlighting of deprecated members

This is configurable on the Java > Editor > Syntax Coloring preference page.

References in Javadoc

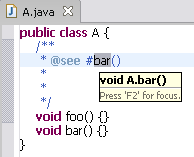
Eclipse now recognizes references to Java elements inside doc comments (i.e., @see, @link, @linkplain, @throws, @exception, @param or @value tags). This enables hover help and linking to the referenced Java element.

picture of Java editor with hover in Javadoc


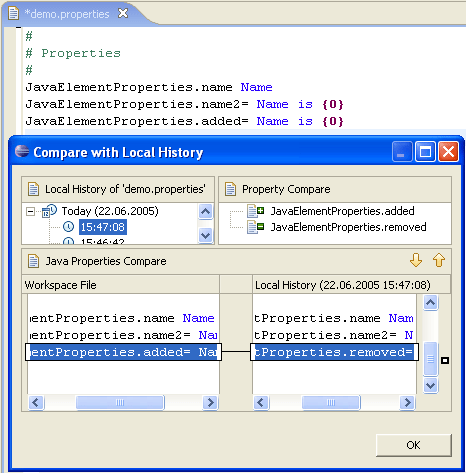
Improved Java properties file editor

The editors for Java property files have been greatly improved. They offer syntax highlighting, improved double-clicking behavior, and a separate font preference. The syntax highlighting colors are adjusted from the Java > Properties File Editor preference page. Spell checking is available, and Quick Fix (Ctrl+1) can be used to fix spelling problems. You can also use Navigate > Open (F3) or Ctrl+Click to navigate from a property key in the editor back to places in the code where the key is referenced.

Picture of Java Properties File editor


Working with externalized strings

When you linger over a key for an externalized string in the Java editor, the associated externalized value is shown in a hover:

Picture of Externalize String hover

Ctrl+Click on it to navigate directly to the entry in the corresponding Java properties file.


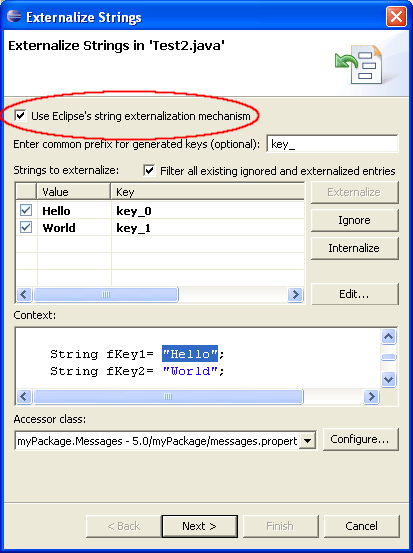
Externalize Strings wizard supports new message bundles

The Externalize Strings wizard supports Eclipse's string externalization mechanism which is new with this release:

Picture of Externalize Strings wizard


New Open Type dialog

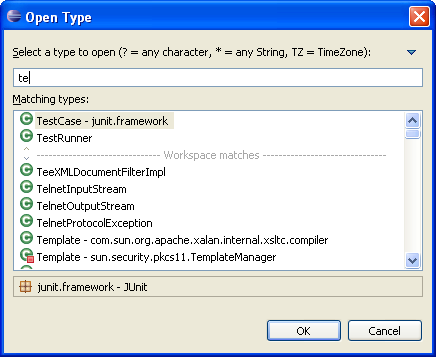
The Java Open Type dialog has been improved in a number of ways:
  • There is now only a single list to select from.
  • A history of recently opened types shows up first in the dialog; workspace types matching the pattern appear below the separator line.
  • CamelCase pattern matching takes you to a type with fewer keystrokes. For example TZ matches TimeZone or IOOBE matches IndexOutOfBoundsException.
  • The content of the dialog can further be constrained to a working set. The working set can be selected from the dialog's drop down menu.

Open type dialog

There are major architectural changes under the hood as well. The types shown in the dialog are now found with a Java search engine query. This nets a saving of 4-6MB on a normal Eclipse development workspace over the memory-hungry approach used previously.


Organizing workspace with many projects

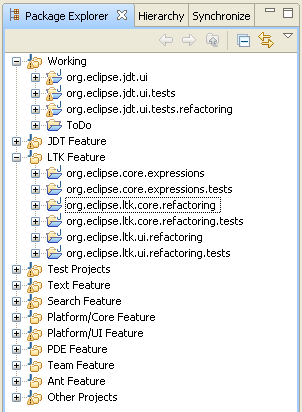
Use Show > Working Sets in the Package Explorer's view menu to enable a new mode that shows working sets as top level elements. This mode makes it much easier to manage workspaces containing lots of projects.

Package Explorer in Working Set mode

Use Select Working Sets from the Package Explorer's view menu to configure which working sets get shown. The dialog lets you create new Java working sets, define which working sets are shown and in what order. Working sets can also be rearranged directly in the Package Explorer using drag and drop and copy/paste.


Improved source folder page for new Java project wizard

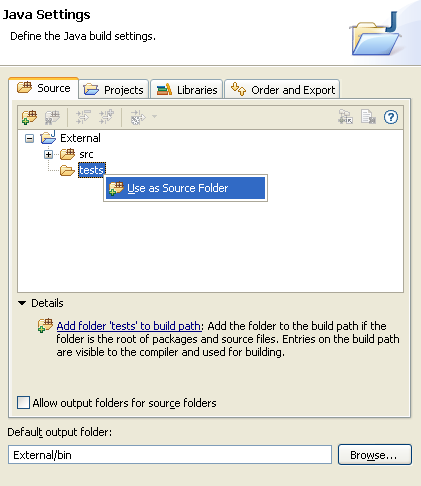
An improved source folder configuration page in the Java project creation wizard assists you in creating projects from existing source. You can define source folder entries, include/exclude folders directly on the tree, and test the results of your action right away.

New source folder page


Sharing Java project settings

Each Java project can carry custom settings for compiler options and code style. These settings are stored in the project itself, and automatically applied when the project is loaded (or updated) from the repository.

Modifying the settings of a Java project via the UI automatically writes the settings to a file in the .settings directory. (The contents of the setting file are auto-generated, and not intended to be edited directly).

Shareable compiler settings


New Quick Assists

Several Quick Assists (Ctrl+1) have been added to the Java Editor:
  • Invert boolean expressions:
    Picture of invert conditions quick assist
  • Invert a conditional expression:
    Invert condition quick assist
    results in:
    Inverted result
  • Convert conditional expression (? operator) to if-else statement, or vice versa
  • Introduce a new local variable after an instanceof check:
    Assign cast to local before invocation
    results in:
    Result after quick assist invocation
  • Break out single substring literal:
    Pick out string quick assist
    results in:
    Result of 'Pick out string' quick assist

Refactoring Undo/Redo available from Edit menu

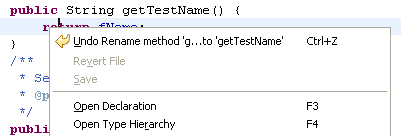
Refactoring Undo/Redo is now available from the Edit menu, and the separate Refactor Undo/Redo actions have been removed from the global menu bar. Additionally, refactoring Undo/Redo operations are now integrated with the Java editor Undo/Redo, resulting in a more transparent undo story in the editor. For example, a refactoring triggered from within the editor is now undoable in the editor by simply pressing Ctrl+Z.

Undo action in editor context menu


New Eclipse default built-in formatter profile

Although Eclipse's default 3.0 code formatter profile was named "Java Conventions", formatting a file using this profile used tabs for indentation rather than spaces. In 3.1, A new default profile, named "Eclipse" has been added, that matches the default formatter options in previous releases (and thus uses tabs for indentation). To use settings that match the current, generally accepted Java conventions, simply switch the formatter profile to "Java Conventions" using the Java > Code Style > Formatter preference page.

Rerun failed tests first

There's a new action in the JUnit view that allows you to rerun failing tests before any of the ones that were passing.

Rerun last failed tests


Debugging locks and deadlocks

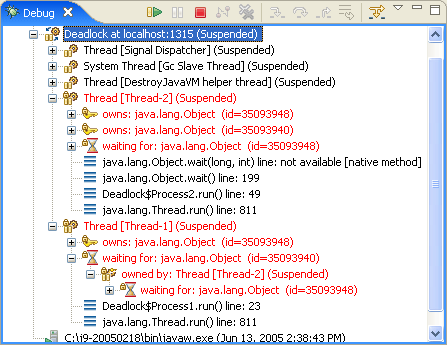
The locks owned by a thread as well as the lock a thread is waiting for can both be displayed inline in the Debug view by toggling the Show Monitors menu item in the Debug view drop-down menu. Threads and locks involved in a deadlock are highlighted in red.

A deadlock displayed in the Debug view


Breakpoint organization

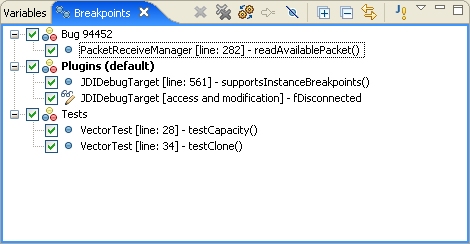
The Breakpoints view allows breakpoints to be grouped by type, project, file, or working sets, and supports nested groupings. You can use breakpoint working sets to group breakpoints into problem-specific sets that can be quickly enabled and disabled as a whole. Newly-created breakpoints are automatically placed into the default breakpoint working set (displayed in bold). You can copy and paste or drag and drop breakpoints between breakpoint working sets, and a breakpoint can be placed in more than one breakpoint working set.

Breakpoints view showing working sets


Navigating stack traces

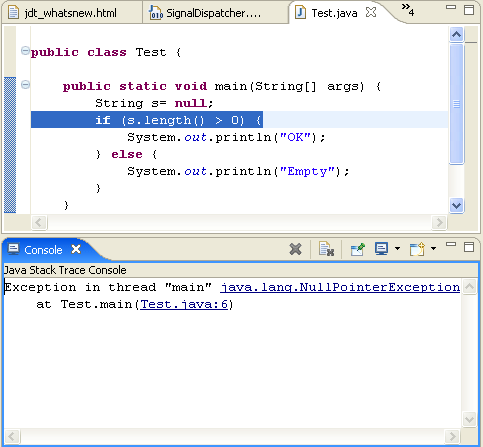
Copy and paste a stack trace into the Java Stack Trace Console and use hyperlinks to navigate the trace. The Java Stack Trace Console can be opened from the Open Console drop-down menu in the Console view. Pasted stack traces can be formatted via the standard Format key binding.
Java Stack Trace Console


New features in the Debugger Variables view

Several enhancements have been made to the Variables view, including:

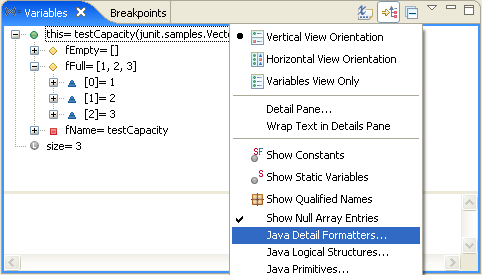
  • The toString()-computed value of a variable can be displayed inline in the Variables view tree, as well as in the details area. The Java Detail Formatters... command in the view drop-down menu is used for configuring how this feature works.
  • The Java debugger now lets you control what gets shown in the variables view for different types of objects. For example, collections can be displayed as a simple array of values, instead of the gory details on how that particular collection object is implemented. This is done from the Java > Debug > Logical Structures preference page, where you associate with a specific class or interface either a single expression (for example, this.toArray()) or a series of named expressions. When the object is to be shown in the variables view, the expressions are evaluated to produce the values to display.
  • The Java debugger now lets you change the value of variables by entering an expression into either the Change Value dialog or into the details area of the variables view and pressing Save.
  • The Find Variable action in the Variables view allows you to type in the name of a variable you are looking for. As you type, the Variables view selects the next visible variable matching the entered text. As well, the Find variable dialog shows variables matching the text entered so far.

Inline toString() example


PDE


Bundle manifests for plug-ins

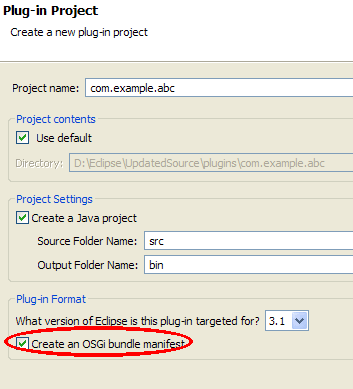
In Eclipse 3.1, it is strongly recommended that plug-ins contain an OSGi bundle manifest.mf. In addition to faster startup and classloading, this format will allow you to take advantage of many of the new runtime capabilities such as fine control over what packages you want to expose to clients.

The option to create a manifest.mf in the New Plug-in Project creation wizard is now on by default.

New Plug-in Wizard

You can create a bundle manifest.mf for an existing plug-in on the Overview page of the plug-in manifest editor.

Plug-in Content


PDE enforces code accessibility

The plug-in's manifest.mf file allows you to control on a per-package basis the visibility of your plug-in's code to downstream plug-ins.

PDE manages each plug-in's Java classpath and checks these visibility rules at compile time. This means no one will never be caught by surprise by classloading errors at runtime, and will always be aware when they are referencing internal (discouraged) types.

discouraged access


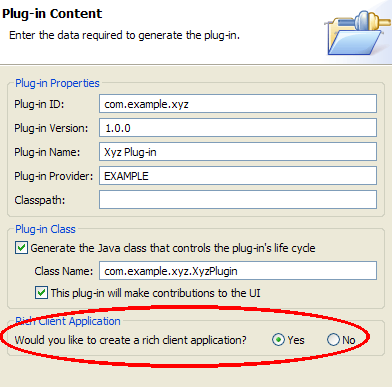
Creating an RCP application

The New Plug-in Project wizard gives you the option to create a rich client application.

Rich Client


RCP templates

The New Plug-in Project wizard provides ready-to-run RCP templates. The templates range from a minimal Hello RCP template to a rich, fully-branded RCP mail template.

RCP templates


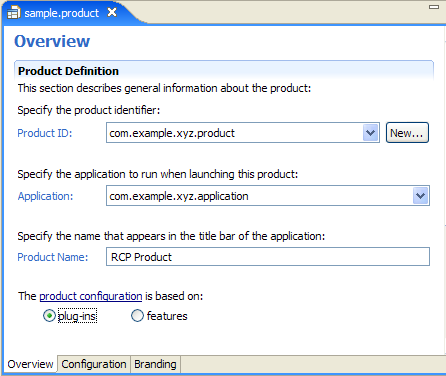
Build an Eclipse product with a single click

You can now create and manage an Eclipse product in a *.product file, which can be created via File > New > Other... > Product Configuration.

The product configuration editor manages all aspects of a product from basic definition to branding. You can create plug-in-based and feature-based products. The overview page provides hot links to test and export the product.

product editor


Eclipse product export wizard

You can export an Eclipse product as an archive or a directory structure in the Eclipse Product Export wizard.

The wizard is invoked via File > Export > Eclipse Product or from the Overview page of the Product Configuration editor.

Export Wizard


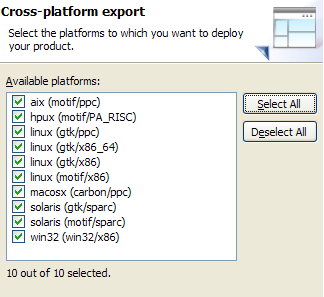
Cross-platform product export

If you have the RCP delta pack installed, you can now build and export your product for multiple platforms at the same time via the Eclipse Product export wizard (File > Export > Eclipse Product).

Cross Platform


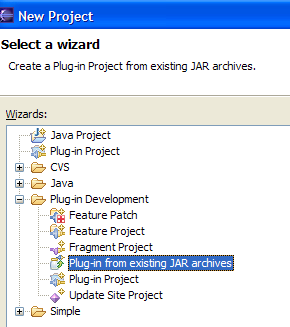
Create a plug-in from existing JAR

PDE now provides a wizard that creates a plug-in from existing JAR archives. This wizard is ideal if you would like to package third-party non-Eclipse JARs as an Eclipse plug-in.

The wizard can be invoked via File > New > Project > Plug-in from existing JAR archives.

Bundlizer


Manifest.mf validation

PDE now flags syntactic and semantic errors in the plug-in's manifest.mf file.

manifest.mf validation


Improved plugin.xml validation

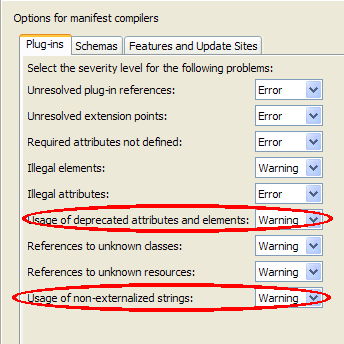
Attributes and elements defined in extension point schemas can now be marked as translatable. Also, obsolete attributes and elements can be marked as deprecated, in the same spirit as the @deprecated tag in obsolete Java APIs.

PDE uses this metadata to flag the usage of deprecated and non-externalized attributes and elements in the plug-in's manifest files.

Manifest Compiler


Validate plug-in set before launching

Prior to launching your Eclipse application, you can now validate the selected subset of plug-ins to find lurking launch startup problems such as unsatisfied plug-in dependencies, missing applications, etc.

Validate Plug-ins


No need to use -clean

When self-hosting with PDE, you no longer need to launch a runtime Eclipse application with the -clean program argument. Leaving this argument off significantly improves startup time.

Improved feature and update site support

The PDE feature and update site manifest editors have been redesigned to provide a simpler and better workflow.  Improvements include the ability to build and package features without having to import them into your workspace.
JNLP manifests and JAR signing

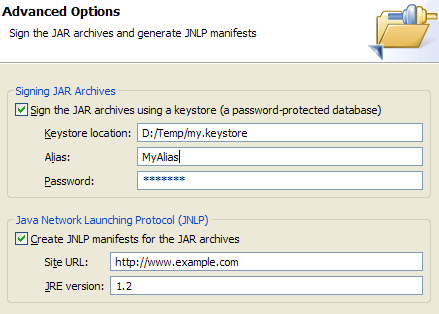
The feature export wizard now provides you with the option to create JNLP manifests and digitally sign your plug-in and feature archives for Java Web Start deployment.

JNLP and signed