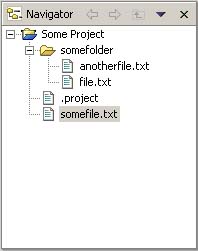
This view provides a hierarchical view of the resources in the Workbench.
Here is what the Navigator view looks like:
This command displays the hierarchy that was displayed immediately prior to the current display. For example, if you Go Into a resource, then the Back command in the resulting display returns the view to the same hierarchy from which you activated the Go Into command. The hover help for this button tells you where it will take you. This command is similar to the Back button in a web browser.
This command displays the hierarchy that was displayed immediately after the current display. For example, if you've just selected the Back command, then selecting the Forward command in the resulting display returns the view to the same hierarchy from which you activated the Back command. The hover help for this button tells you where it will take you. This command is similar to the Forward button in a web browser.
This command displays the hierarchy of the parent of the current highest-level resource. The hover help for this button tells you where it will take you.
This command sorts the resources in the Navigator view according to the selected schema:
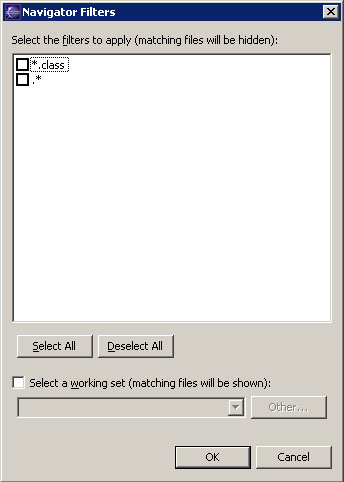
This command allows you to select filters to apply to the view so that you can show or hide various resources as needed. File types selected in the list will not be shown in the Navigator. Here is what the file filters dialog looks like:
This command allows you to create a new resource in the Workbench. Select the type of resource to create from the submenu.
This command displays a new hierarchy in the Navigator view, with the children of the selected resource as its contents. For example if you Go Into a project, the Navigator will be refocused on the immediate files and folders of the project.
This command opens the selected resource. If the resource is a file that is associated with an editor, then the Workbench launches the associated internal, external, or ActiveX editor and opens the file in that editor.
This command allows you to open an editor other than the default editor for the selected resource. Specify the editor with which to open the resource by selecting an editor from the submenu.
This command copies the selected resource to another location. A dialog will appear, prompting for the destination location for the copy of the resource.
This command moves the selected resource to another location. A dialog will appear, prompting for the destination location to which the resource will be moved.
This command allows you to specify a new name for the selected resource.
This command deletes the selected resource from the Workbench.
This command opens the import wizard and allows you to select resources to import into the Workbench.
This command opens the export wizard and allows you to export resources to an external location.
This command adds a bookmark that is associated with the selected resource (but not to a specific location within the resource).
This command invokes a full build on the project of the currently selected resource.
This command refreshes the Workbench's view of the selected resource and its children. This is used for example when for an existing project you externally create a new file in the file system and wish the file to appear in the Navigator view.
Menu items in the Team submenu are related to version control management and are determined by the version control management system that is associated with the project. Eclipse provides the special menu item Share Project... for projects that are not under version control management. This command will present a wizard that allows the user to choose to share the project with any version control management systems that has been added to Eclipse. Eclipse ships with support for CVS.
Commands on the Compare With submenu allow you to do one of the following types of compares:
After you select the type of compare you want to do, you will either see a compare editor or a compare dialog. In the compare editor, you can browse and copy various changes between the compared resources. In the compare dialog, you can only browse through the changes.
Commands on the Replace With submenu allow you to replace the selected resource with another state from te local history. If the project is under version control management, there may be addition items supplied by the version control management system as well.
This command displays the properties of the selected resource. The kinds of properties that are displayed depend on what type of resource is selected. Resource properties may include (but are not limited to):
![]()
Team programming with CVS
Compare Editor
Three-way compare
![]()