Launching RAP Applications
To start your RAP application from the IDE, you have two choices.
For simple applications that are not based on OSGi, you can use the
RWT Launcher.
If your application needs OSGi to run (e.g. a workbench application) then you have to use the
RAP Launcher.
To create a launch configuration, select Run Configurations… from the Run
menu and create a New launch configuration of the desired type.
The simplest way to launch an RWT application is to run it using an RWT Application launch
configuration. This launch configuration type uses information derived from the workbench
preferences and your applications's Java project to launch the program.
-
In the Package Explorer, select the Java compilation unit or class file
with the entry point you want to launch.
-
Press the Run [
 ]
button in the workbench toolbar or select Run > Run from the
workbench menu bar.
Alternatively, select Run As > RWT Application in the Package
Explorer pop-up menu, or select Run > Run As > RWT Application
in the workbench menu bar, or select Run As > RWT Application in
the drop-down menu on the Run tool bar button.
]
button in the workbench toolbar or select Run > Run from the
workbench menu bar.
Alternatively, select Run As > RWT Application in the Package
Explorer pop-up menu, or select Run > Run As > RWT Application
in the workbench menu bar, or select Run As > RWT Application in
the drop-down menu on the Run tool bar button.
-
The application is now launched. A browser will be opened for you to interact with the
application.
You can also launch an RWT application by selecting a project instead of the compilation unit
or class file. You will be prompted to select a class from those classes that define an entry
point. If only one class with a main method is found in the project, that class is launched as
if you selected it.
When an RWT Application launch configuration is launched, it first terminates any possibly
running launch that shares the same launch configuration.
After a correct startup, a message like the one below should be displayed in the Console view:
INFO: Started SocketListener on 0.0.0.0:<port>.
Further configuration options
Normally, most of the launch parameters are derived from your Java project and your workbench
preferences.
In some cases, you will want to override the derived parameters or specify additional arguments.
On the Main tab you can control the following aspects of the launch:
- The project field denotes the project that contains the entry point to
launch. You do not have to specify a project, but doing so allows a default classpath, source
lookup path, and JRE to be chosen.
-
The Application entry point lets you specify what should be launched.
For simple use cases it is recommended to choose Run entry point class and
specify the class that implements the
org.eclipse.rwt.lifecycle.IEntryPoint
interface in the class name field.
If you wish to have more control or even would like to run an arbitrary web application,
select Run from web.xml and enter the path to the web.xml in the location
field. The servlet path should point to one of the servlets defined in the web.xml and is
used to construct the URL to be opened with the browser.
- The browser group lets you control whether the application should be
opened with the internal browser in the editor area or with an external browser or if no
browser should be opened at all.
The outcome depends on the browser preference settings that can be reached with the
Configure browsers... link.
- It is recommended to let the launcher dynamically choose a free port for
client-server communication. However if you would like to have full control
over the communication channel, you can enable Manual Port Configuration
and explicitly specify a port number.
For an explanation of the other tabs see the topic
Creating a Java application launch configuration
The RAP Launcher is based on the
OSGi Launcher
and adds a Main tab page to it.
Please note, that the RAP Launcher only works when the Equinox OSGi Framework is selected,
which is the default setting on page Bundles.
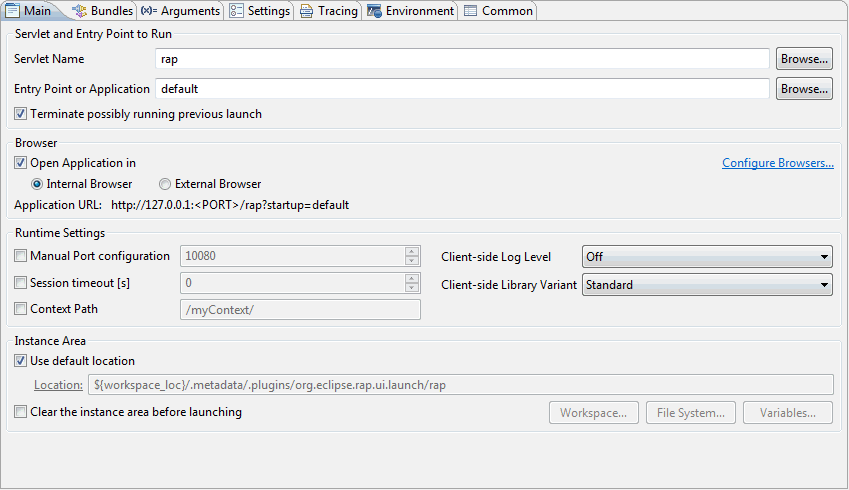
Servlet and Entry Point/Application to Run
Within this group you need to choose the combination of servlet name and
entry point/application you would like to run.
When the Browse… button is pressed, a selection dialog opens.
This dialog lists all servlet names and entry points/applications available in the workspace.
Open the drop down menu item in the top right corner and select Include Target
Platform if you also want to see the servlet names and entry points/applications available
in your target platform.
The RAP Launcher will display an error in case the selected servlet name, entry point or
application is not contained in the selection on the Bundles page.
When the Terminate possible running previous launch option is selected,
an eventually running launch with the same name will be terminated before launching.
This might come in handy when frequently changing code and restarting the application.
Browser
Controls whether the application should be opened with the internal browser in the editor area
or with an external browser or if no browser should be opened.
The outcome depends on the browser preference settings that can be reached with the
Configure Browsers... link.
Manual Port Configuration
It is recommended to let the launcher dynamically choose a free port for client-server
communication.
However if you would like to have full control over the communication channel, you can
explicitly specify a port number.
Session Timeout
Specifies the servlet session timeout in seconds.
If the checkbox is unselected, the session will never expire.
Context Path
A web application can be deployed with a context path. After deployment the web application
will be accessible using this path e.g. http://server:port/contextPath/webapp.
To simulate this during development time you can use the option to specify a context path
within the Main tab.
Client-side Log Level
This option is outdated as of RAP 1.4.
It is only there to support earlier runtime versions of RAP.
Since 1.4, the RAP client will fast-fail in case of an error but not write any log messages
during normal operation anymore.
Client-side Library Variant
The JavaScript client of RAP can be delivered in two variants.
The Standard version is optimized for speed and size by compressing the JavaScript
code.
The Debug version maintains the JavaScript code in its original form.
We recommend to use the Debug variant when developing custom widgets for RAP.
Instance Area
The instance area location sets the Program Arguments to define the
osgi.instance.area. Bundles use this location to store their state location
data.
Required plug-ins
In the Bundles tab, the following bundles need to be activated:
- com.ibm.icu.base
- javax.servlet
- org.apache.commons.logging
- org.eclipse.core.commands
- org.eclipse.core.contenttype
- org.eclipse.core.databinding
- org.eclipse.core.databinding.beans
- org.eclipse.core.databinding.observable
- org.eclipse.core.databinding.property
- org.eclipse.core.expressions
- org.eclipse.core.jobs
- org.eclipse.core.runtime
- org.eclipse.equinox.app
- org.eclipse.equinox.common
- org.eclipse.equinox.http.jetty
- org.eclipse.equinox.http.registry
- org.eclipse.equinox.http.servlet
- org.eclipse.equinox.preferences
- org.eclipse.equinox.registry
- org.eclipse.help
- org.eclipse.osgi
- org.eclipse.osgi.services
- org.eclipse.rap.demo
- org.eclipse.rap.jface
- org.eclipse.rap.jface.databinding
- org.eclipse.rap.rwt
- org.eclipse.rap.rwt.q07
- org.eclipse.rap.ui
- org.eclipse.rap.ui.forms
- org.eclipse.rap.ui.views
- org.eclipse.rap.ui.workbench
- org.mortbay.jetty.util
- org.mortbay.jetty.server
Servlet engine log
By default the servlet engine (namely Jetty) is configured to suppress most logging
information. This can be changed by adding the VM argument
-Dorg.eclipse.equinox.http.jetty.log.stderr.threshold=<log level>
to the launch configuration. Valid log levels are debug,
info, warn, error, and off.
The default value is warn.
To launch a once created launch configuration you may use the launch shortcut keys
Alt+Shift+X+R (run) and Alt+Shift+D+R (debug).
Alternatively, you can also use the plain OSGi Launcher to start RAP applications.
In this case, you have to set the necessary system properties and program arguments on your own.
This includes setting the HTTP port for the server with the
-Dorg.osgi.service.http.port=<PORT> VM argument.