This document describes how to quickly create and launch a first user interface with RAP. Developing an entire application involves more steps, that depend on the type of application setup you choose. These steps are explained in the part on application development. If you want to create a Workbench-based application, start with a template instead (see Examples).
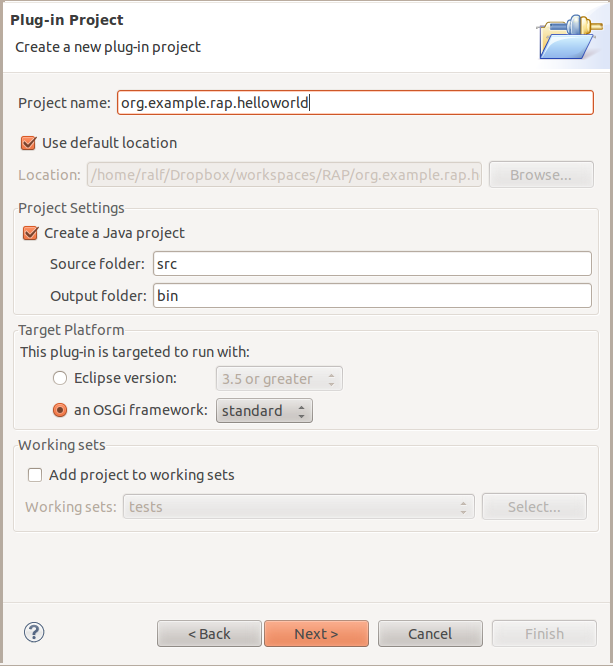
First we need a project for our application.
We create a plug-in project because that's the type of projects used for developing
OSGi bundles with PDE.
From the menu, select File > New > Plug-in Project.
Let's call the plug-in org.example.rap.helloworld.
In the Target Platform box, choose
an OSGi framework and standard to create a
bundle that is compatible with any OSGi framework.
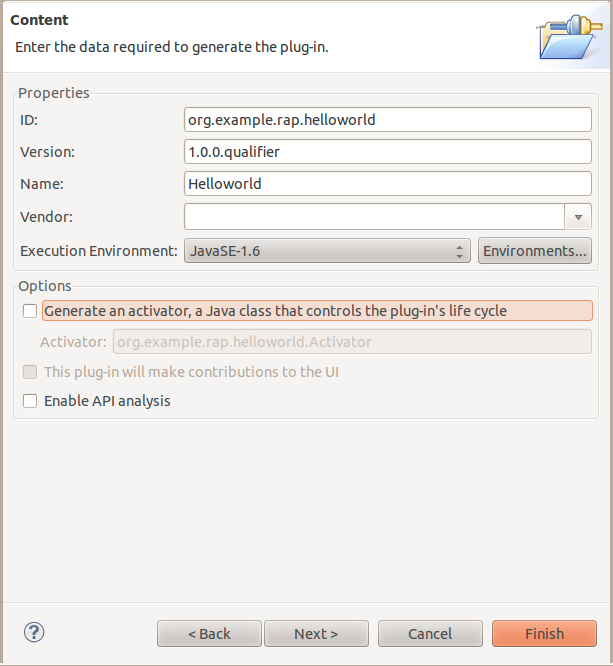
On the second page of the wizard, disable the option Generate an activator, …. This would create a bundle activator, but we don't need that now.
To display some widgets, we need a dependency to the RAP widget toolkit (RWT), which is RAP's
implementation of SWT.
It is contained in the plug-in org.eclipse.rap.rwt.
To add this dependency, open the bundle manifest file META-INF/MANIFEST.MF.
In the Plug-in Manifest Editor, go to the Dependencies page.
Add org.eclipse.rap.rwt to the list of Required Plug-ins
and save.
Every RAP application needs an entrypoint that creates the initial UI of the application. An entrypoint is a class that implements the interface IEntryPoint. (As a side note, workbench-based applications can also implement the Eclipse-specific interface IApplication).
Before creating the Java code, we need a package.
It's a good practice to name the main package in a bundle after the bundle id, so
let's name the package org.example.rap.helloworld.
In this package, we create a class named EntryPoint that implements
IEntryPoint.
In the method createUI, we add some SWT code.
You can generate the skeleton of this code using an SWT template (type main and hit
Ctrl+Space, then select the template named mainloop).
In the example below, we added a Button with the text “Hello world!”:
  public class EntryPoint implements IEntryPoint {

    public int createUI() {
      Display display = new Display();
      Shell shell = new Shell( display );
      shell.setLayout( new GridLayout( 1, false ) );

      Button button = new Button( shell, SWT.PUSH );
      button.setText( "Hello world!" );

      shell.pack();
      shell.open();
      return 0;
    }
  }
Note: This template will generate a couple more lines after the
shell.open(), called the SWT main loop.
You also find this code in SWT snippets.
For workbench-based application, the main loop must be present, but for our simple applications,
it must be removed
(read about application setups to understand
the difference).
Now we can already launch this entrypoint using the RWT launcher. Select Run As > RWT Application from the context menu of the entrypoint class. A browser view should open up soon afterwards and show your running application. More on launching RAP applications in the chapter Launching RAP Applications.
Until now, we only have a project with an entrypoint. To turn this into a complete application, the entrypoint must be registered so that the framework can find it. For a workbench application, this would be done using an extension. Leightweight OSGi applications register the entrypoint in their application configuration. These topics are covered in the part on application development.