

| UML2 Sequence Diagram Framework | ||
|---|---|---|
|
|
|
|
| Generic State System | CTF Parser | |
The purpose of the UML2 Sequence Diagram Framework of TMF is to provide a framework for generation of UML2 sequence diagrams. It provides
The following chapters describe the Sequence Diagram Framework as well as a reference implementation and its usage.
In the UML2 Sequence Diagram Framework an Eclipse extension point is defined so that other plug-ins can contribute code to create sequence diagram.
Identifier: org.eclipse.linuxtools.tmf.ui.uml2SDLoader
Description: This extension point aims to list and connect any UML2 Sequence Diagram loader.
Configuration Markup:
<!ELEMENT extension (uml2SDLoader)+>
<!ATTLIST extension
point CDATA #REQUIRED
id    CDATA #IMPLIED
name  CDATA #IMPLIED
>
<!ELEMENT uml2SDLoader EMPTY>
<!ATTLIST uml2SDLoader
id      CDATA #REQUIRED
name    CDATA #REQUIRED
class   CDATA #REQUIRED
view    CDATA #REQUIRED
default (true | false)
The TMF UI plug-in is responsible for evaluating each contribution to the extension point.
With this extension point, a loader class is associated with a Sequence Diagram View. Multiple loaders can be associated to a single Sequence Diagram View. However, additional means have to be implemented to specify which loader should be used when opening the view. For example, an eclipse action or command could be used for that. This additional code is not necessary if there is only one loader for a given Sequence Diagram View associated and this loader has the attribute "default" set to "true". (see also
Using one Sequence Diagram View with Multiple Loaders)
For this extension point a Sequence Diagram View has to be defined as well. The Sequence Diagram View class implementation is provided by the plug-in org.eclipse.tracecompass.tmf.ui ( org.eclipse.tracecompass.tmf.ui.views.uml2sd.SDView) and can be used as is or can also be sub-classed. For that, a view extension has to be added to the plugin.xml.
The loader class provides a frame containing all the UML2 widgets to be displayed. The following widgets exist:
For a lifeline, a category can be defined. The lifeline category defines icons, which are displayed in the lifeline header.
The Sequence Diagram View allows the user to zoom in, zoom out and reset the zoom factor.
It is possible to print the whole sequence diagram as well as part of it.
The UML2 Sequence Diagram Framework provides preferences to customize the appearance of the Sequence Diagram View. The color of all widgets and text as well as the fonts of the text of all widget can be adjust. Amongst others the default lifeline width can be alternated. To change preferences select
Windows->Preferences->Tracing->UML2 Sequence Diagrams. The following preference page will show:
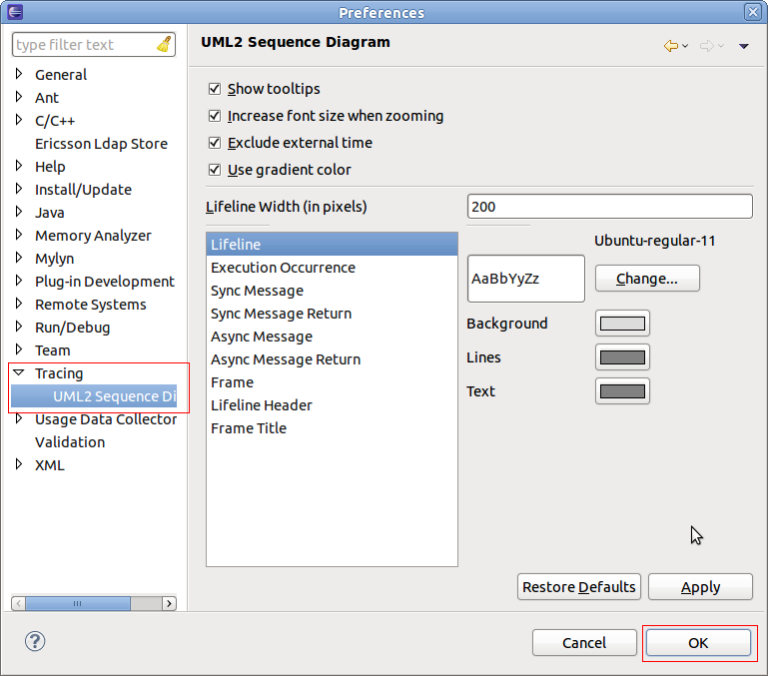
After changing the preferences select
OK.
The Sequence Diagram View provides several callback hooks so that extension can provide application specific functionality. The following interfaces can be provided:
This tutorial describes how to create a UML2 Sequence Diagram Loader extension and use this loader in the in Eclipse.
The tutorial is based on Eclipse 4.4 (Eclipse Luna) and TMF 3.0.0.
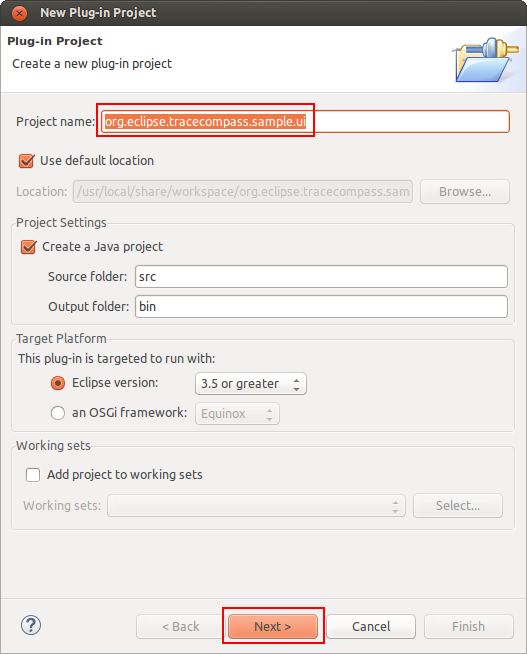
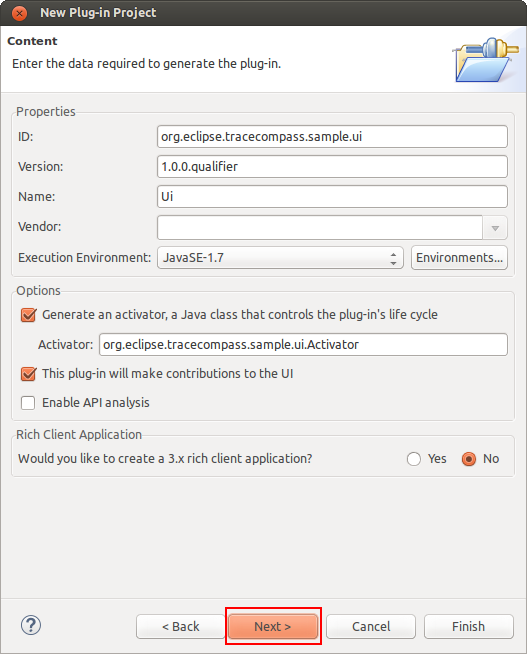
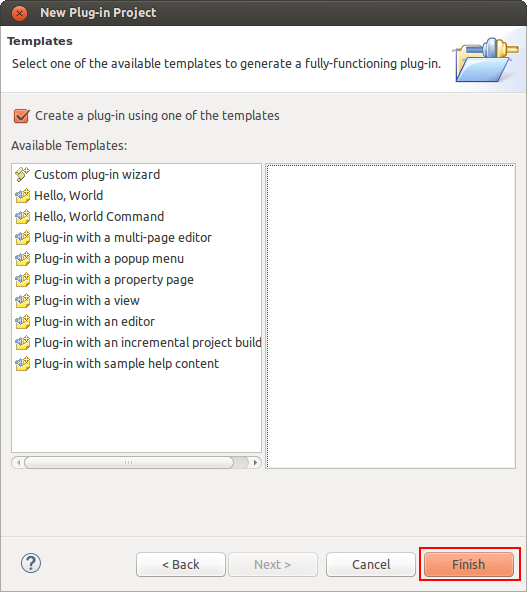
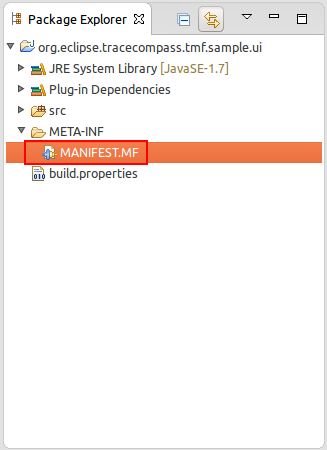
To create a new project with name org.eclipse.tracecompass.tmf.sample.ui select
File -> New -> Project -> Plug-in Development -> Plug-in Project.
To open the plug-in manifest, double-click on the MANIFEST.MF file.
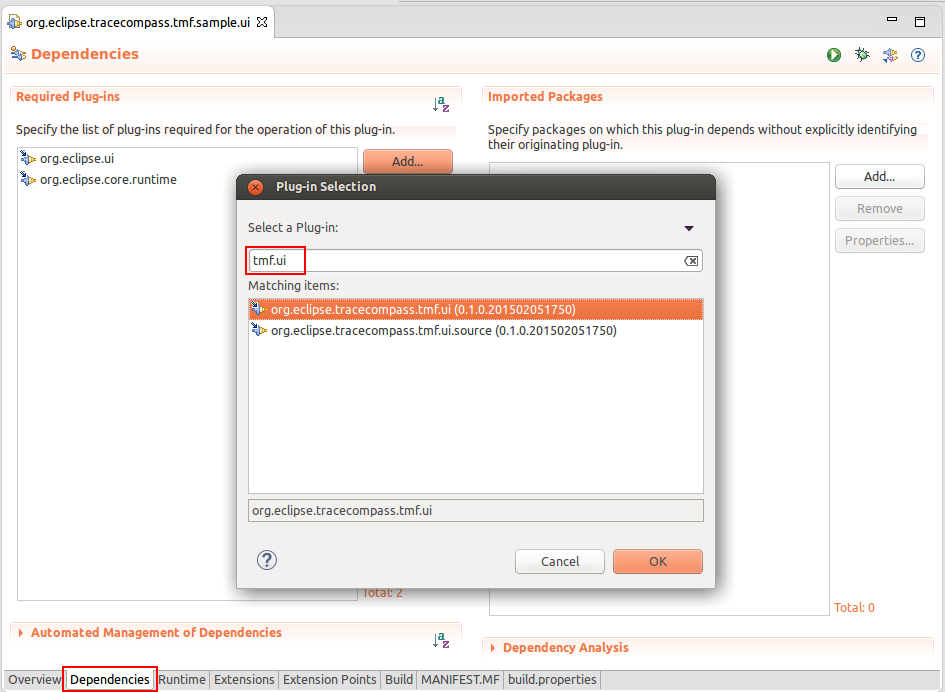
Change to the Dependencies tab and select
Add... of the
Required Plug-ins section. A new dialog box will open. Next find plug-ins
org.eclipse.tracecompass.tmf.ui and
org.eclipse.tracecompass.tmf.core and then press
OK
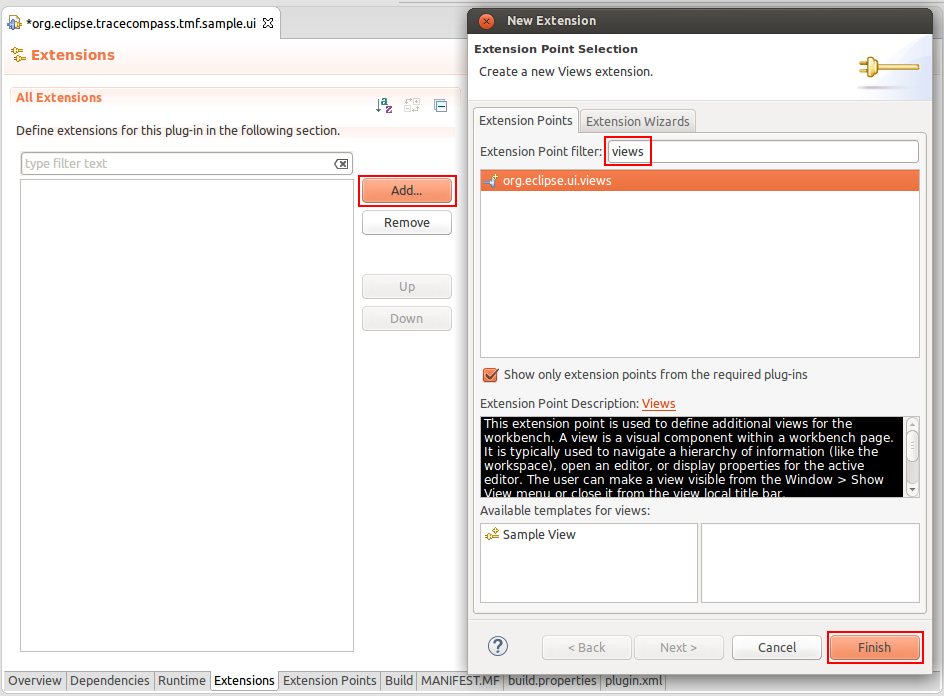
Change to the Extensions tab and select
Add... of the
All Extension section. A new dialog box will open. Find the view extension
org.eclipse.ui.views and press
Finish.
To create a Sequence Diagram View, click the right mouse button. Then select
New -> view
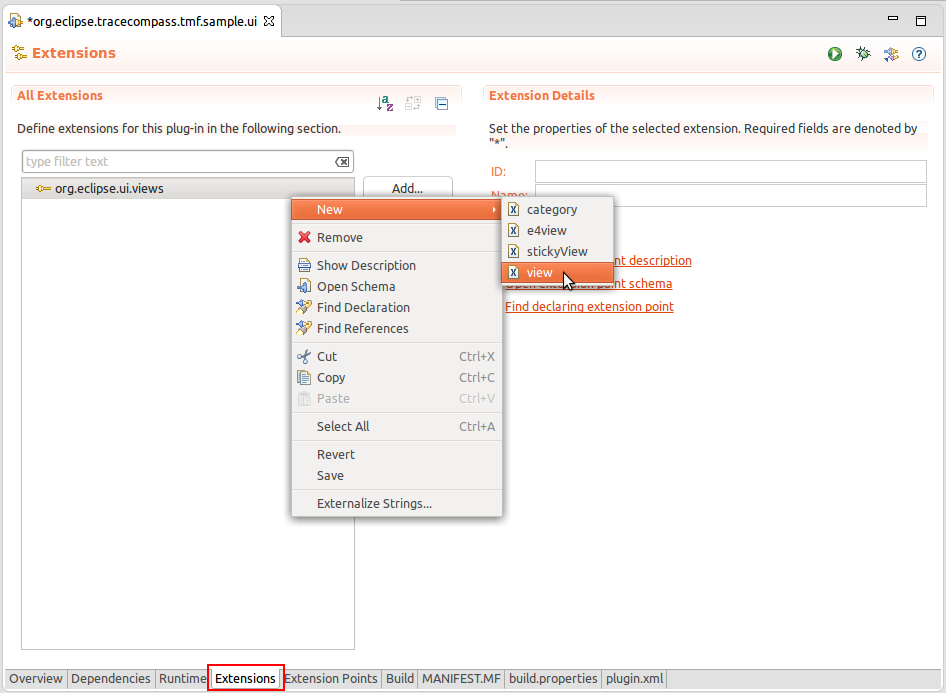
A new view entry has been created. Fill in the fields
id,
name and
class. Note that for
class the SD view implementation (
org.eclipse.tracecompass.tmf.ui.views.SDView) of the TMF UI plug-in is used.
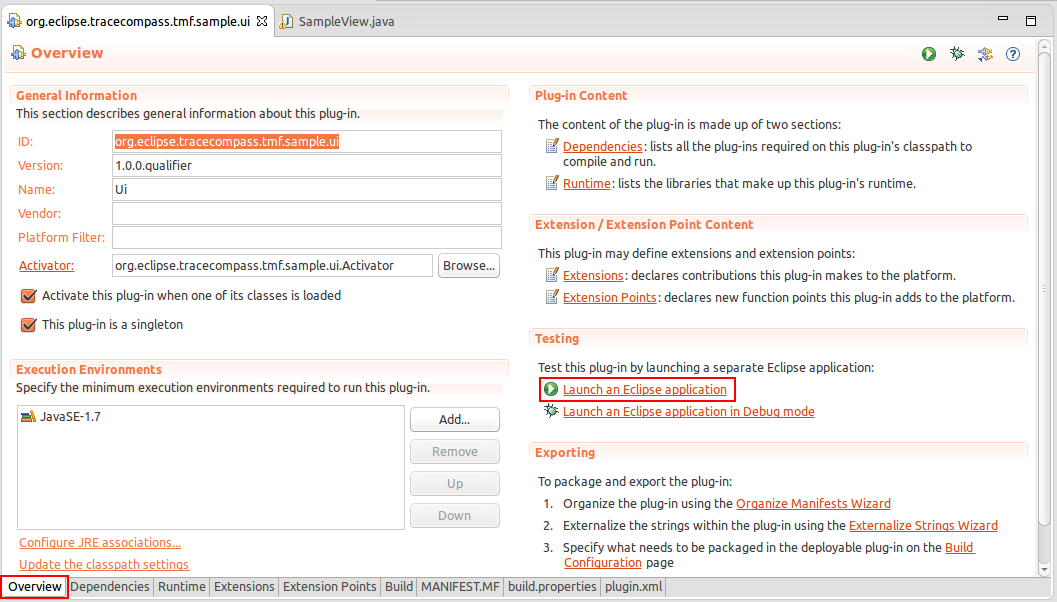
The view is prepared. Run the Example. To launch the an Eclipse Application select the
Overview tab and click on
Launch an Eclipse Application
A new Eclipse application window will show. In the new window go to
Windows -> Show View -> Other... -> Other -> Sample Sequence Diagram.
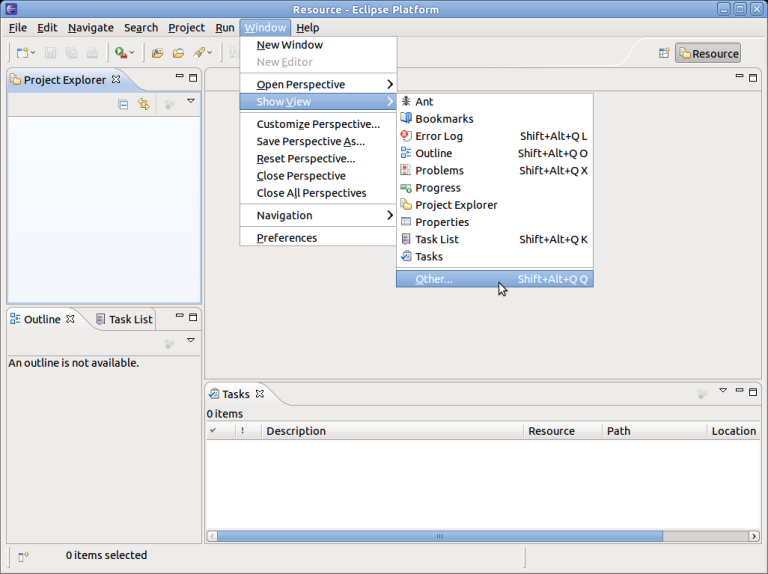
The Sequence Diagram View will open with an blank page.
![]()
Close the Example Application.
After defining the Sequence Diagram View it's time to create the
uml2SDLoader Extension.
To create the loader extension, change to the Extensions tab and select
Add... of the
All Extension section. A new dialog box will open. Find the extension
org.eclipse.linuxtools.tmf.ui.uml2SDLoader and press
Finish.

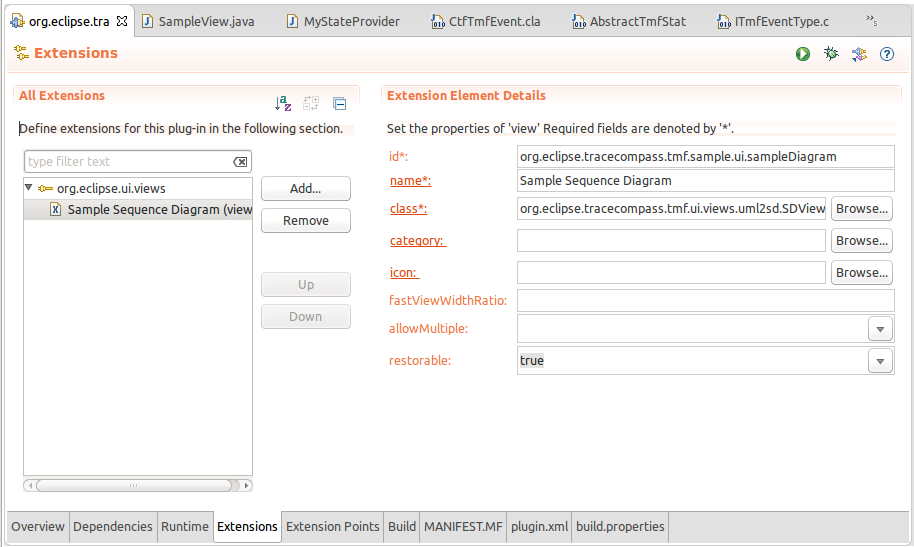
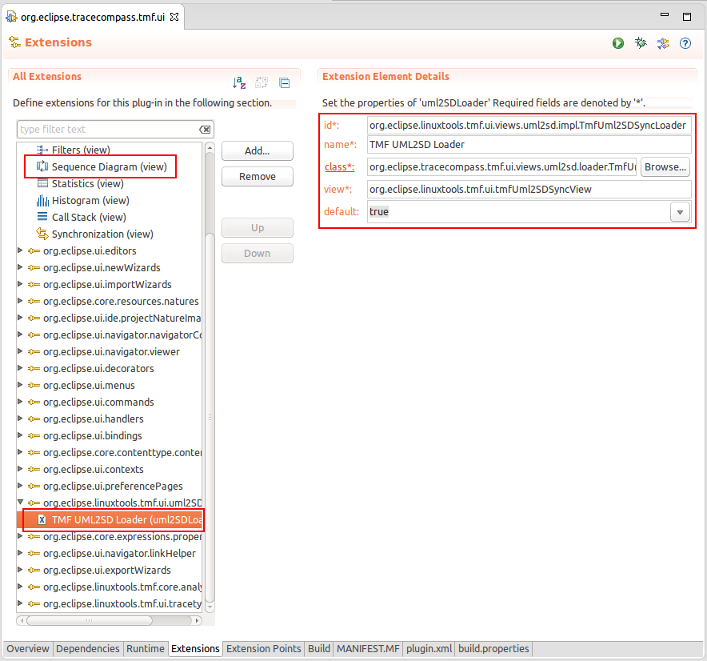
A new 'uml2SDLoader'' extension has been created. Fill in fields
id,
name,
class,
view and
default. Use
default equal true for this example. For the view add the id of the Sequence Diagram View of chapter
Creating a Sequence Diagram View.

Then click on
class (see above) to open the new class dialog box. Fill in the relevant fields and select
Finish.
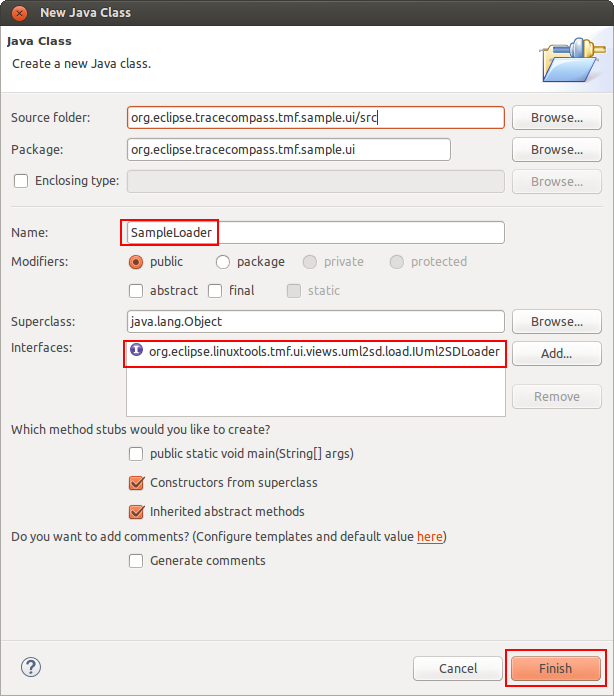
A new Java class will be created which implements the interface
org.eclipse.tracecompass.tmf.ui.views.uml2sd.load.IUml2SDLoader.
package org.eclipse.tracecompass.tmf.sample.ui;

import org.eclipse.tracecompass.tmf.ui.views.uml2sd.SDView;
import org.eclipse.tracecompass.tmf.ui.views.uml2sd.load.IUml2SDLoader;

public class SampleLoader implements IUml2SDLoader {

    public SampleLoader() {
        // TODO Auto-generated constructor stub
    }

    @Override
    public void dispose() {
        // TODO Auto-generated method stub

    }

    @Override
    public String getTitleString() {
        // TODO Auto-generated method stub
        return null;
    }

    @Override
    public void setViewer(SDView arg0) {
        // TODO Auto-generated method stub

    }
Next is to implement the methods of the IUml2SDLoader interface method. The following code snippet shows how to create the major sequence diagram elements. Please note that no time information is stored.
package org.eclipse.tracecompass.tmf.sample.ui;
import org.eclipse.tracecompass.tmf.ui.views.uml2sd.SDView;
import org.eclipse.tracecompass.tmf.ui.views.uml2sd.core.AsyncMessage;
import org.eclipse.tracecompass.tmf.ui.views.uml2sd.core.AsyncMessageReturn;
import org.eclipse.tracecompass.tmf.ui.views.uml2sd.core.EllipsisMessage;
import org.eclipse.tracecompass.tmf.ui.views.uml2sd.core.ExecutionOccurrence;
import org.eclipse.tracecompass.tmf.ui.views.uml2sd.core.Frame;
import org.eclipse.tracecompass.tmf.ui.views.uml2sd.core.Lifeline;
import org.eclipse.tracecompass.tmf.ui.views.uml2sd.core.Stop;
import org.eclipse.tracecompass.tmf.ui.views.uml2sd.core.SyncMessage;
import org.eclipse.tracecompass.tmf.ui.views.uml2sd.core.SyncMessageReturn;
import org.eclipse.tracecompass.tmf.ui.views.uml2sd.load.IUml2SDLoader;
public class SampleLoader implements IUml2SDLoader {
private SDView fSdView;
public SampleLoader() {
}
@Override
public void dispose() {
}
@Override
public String getTitleString() {
return "Sample Diagram";
}
@Override
public void setViewer(SDView arg0) {
fSdView = arg0;
createFrame();
}
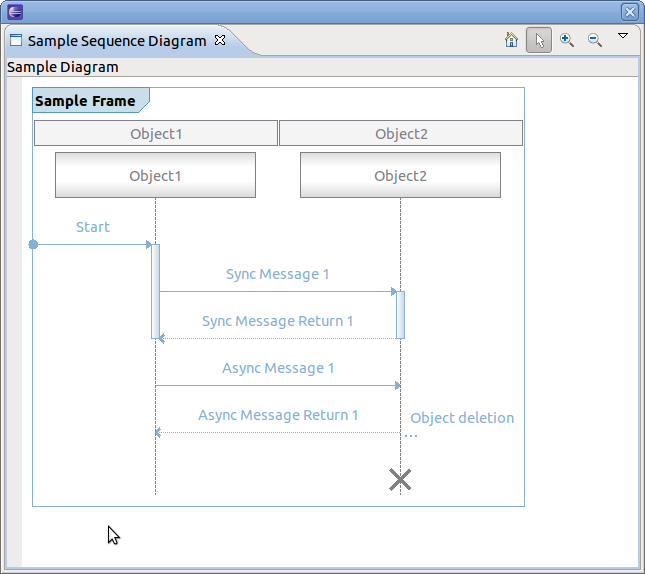
private void createFrame() {
Frame testFrame = new Frame();
testFrame.setName("Sample Frame");
/*
* Create lifelines
*/
Lifeline lifeLine1 = new Lifeline();
lifeLine1.setName("Object1");
testFrame.addLifeLine(lifeLine1);
Lifeline lifeLine2 = new Lifeline();
lifeLine2.setName("Object2");
testFrame.addLifeLine(lifeLine2);
/*
* Create Sync Message
*/
// Get new occurrence on lifelines
lifeLine1.getNewEventOccurrence();
// Get Sync message instances
SyncMessage start = new SyncMessage();
start.setName("Start");
start.setEndLifeline(lifeLine1);
testFrame.addMessage(start);
/*
* Create Sync Message
*/
// Get new occurrence on lifelines
lifeLine1.getNewEventOccurrence();
lifeLine2.getNewEventOccurrence();
// Get Sync message instances
SyncMessage syn1 = new SyncMessage();
syn1.setName("Sync Message 1");
syn1.setStartLifeline(lifeLine1);
syn1.setEndLifeline(lifeLine2);
testFrame.addMessage(syn1);
/*
* Create corresponding Sync Message Return
*/
// Get new occurrence on lifelines
lifeLine1.getNewEventOccurrence();
lifeLine2.getNewEventOccurrence();
SyncMessageReturn synReturn1 = new SyncMessageReturn();
synReturn1.setName("Sync Message Return 1");
synReturn1.setStartLifeline(lifeLine2);
synReturn1.setEndLifeline(lifeLine1);
synReturn1.setMessage(syn1);
testFrame.addMessage(synReturn1);
/*
* Create Activations (Execution Occurrence)
*/
ExecutionOccurrence occ1 = new ExecutionOccurrence();
occ1.setStartOccurrence(start.getEventOccurrence());
occ1.setEndOccurrence(synReturn1.getEventOccurrence());
lifeLine1.addExecution(occ1);
occ1.setName("Activation 1");
ExecutionOccurrence occ2 = new ExecutionOccurrence();
occ2.setStartOccurrence(syn1.getEventOccurrence());
occ2.setEndOccurrence(synReturn1.getEventOccurrence());
lifeLine2.addExecution(occ2);
occ2.setName("Activation 2");
/*
* Create Sync Message
*/
// Get new occurrence on lifelines
lifeLine1.getNewEventOccurrence();
lifeLine2.getNewEventOccurrence();
// Get Sync message instances
AsyncMessage asyn1 = new AsyncMessage();
asyn1.setName("Async Message 1");
asyn1.setStartLifeline(lifeLine1);
asyn1.setEndLifeline(lifeLine2);
testFrame.addMessage(asyn1);
/*
* Create corresponding Sync Message Return
*/
// Get new occurrence on lifelines
lifeLine1.getNewEventOccurrence();
lifeLine2.getNewEventOccurrence();
AsyncMessageReturn asynReturn1 = new AsyncMessageReturn();
asynReturn1.setName("Async Message Return 1");
asynReturn1.setStartLifeline(lifeLine2);
asynReturn1.setEndLifeline(lifeLine1);
asynReturn1.setMessage(asyn1);
testFrame.addMessage(asynReturn1);
/*
* Create a note
*/
// Get new occurrence on lifelines
lifeLine1.getNewEventOccurrence();
EllipsisMessage info = new EllipsisMessage();
info.setName("Object deletion");
info.setStartLifeline(lifeLine2);
testFrame.addNode(info);
/*
* Create a Stop
*/
Stop stop = new Stop();
stop.setLifeline(lifeLine2);
stop.setEventOccurrence(lifeLine2.getNewEventOccurrence());
lifeLine2.addNode(stop);
fSdView.setFrame(testFrame);
}
}
Now it's time to run the example application. To launch the Example Application select the
Overview tab and click on
Launch an Eclipse Application
To add time information in sequence diagram the timestamp has to be set for each message. The sequence diagram framework uses the
TmfTimestamp class of plug-in
org.eclipse.tracecompass.tmf.core. Use
setTime() on each message
SyncMessage since start and end time are the same. For each
AsyncMessage set start and end time separately by using methods
setStartTime and
setEndTime. For example:
    private void createFrame() {
        //...
        start.setTime(TmfTimestamp.create(1000, -3));
        syn1.setTime(TmfTimestamp.create(1005, -3));
        synReturn1.setTime(TmfTimestamp.create(1050, -3));
        asyn1.setStartTime(TmfTimestamp.create(1060, -3));
        asyn1.setEndTime(TmfTimestamp.create(1070, -3));
        asynReturn1.setStartTime(TmfTimestamp.create(1060, -3));
        asynReturn1.setEndTime(TmfTimestamp.create(1070, -3));
        //...
    }
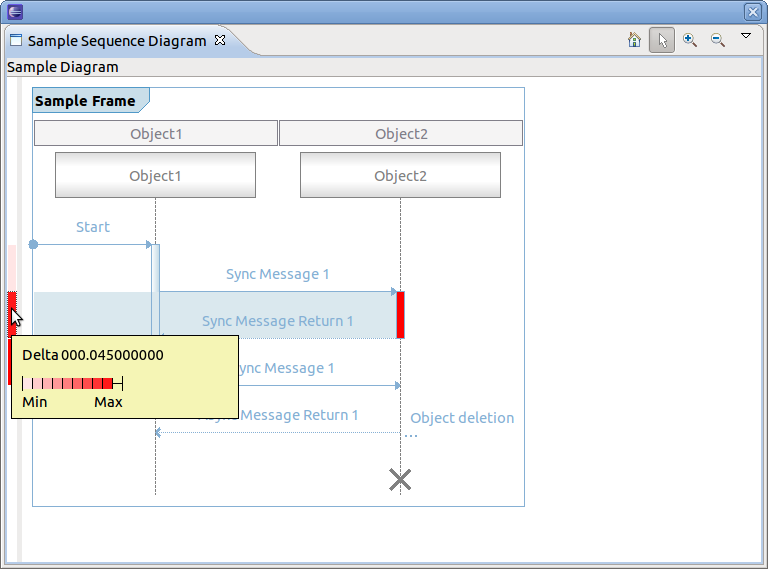
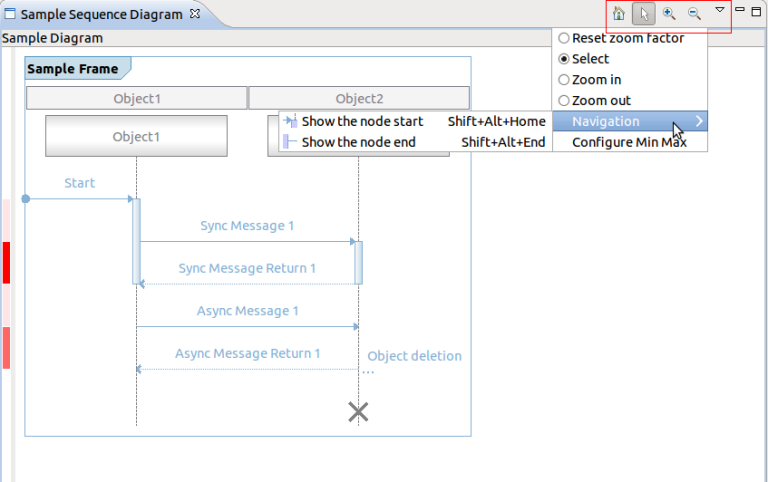
When running the example application, a time compression bar on the left appears which indicates the time elapsed between consecutive events. The time compression scale shows where the time falls between the minimum and maximum delta times. The intensity of the color is used to indicate the length of time, namely, the deeper the intensity, the higher the delta time. The minimum and maximum delta times are configurable through the collbar menu
Configure Min Max. The time compression bar and scale may provide an indication about which events consumes the most time. By hovering over the time compression bar a tooltip appears containing more information.
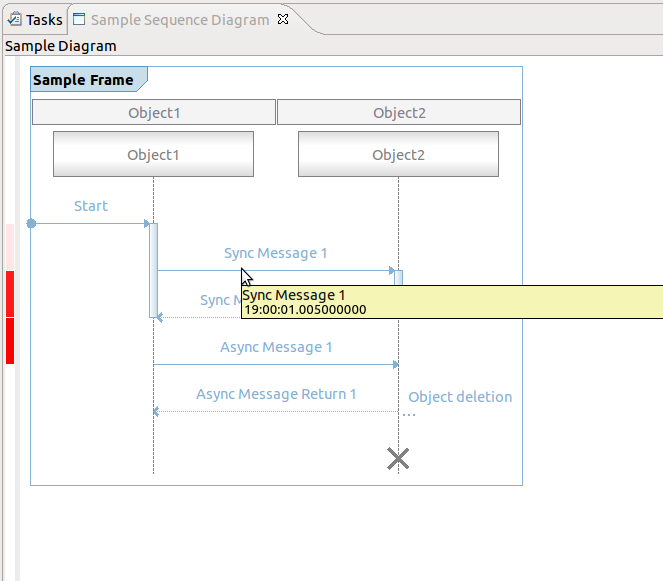
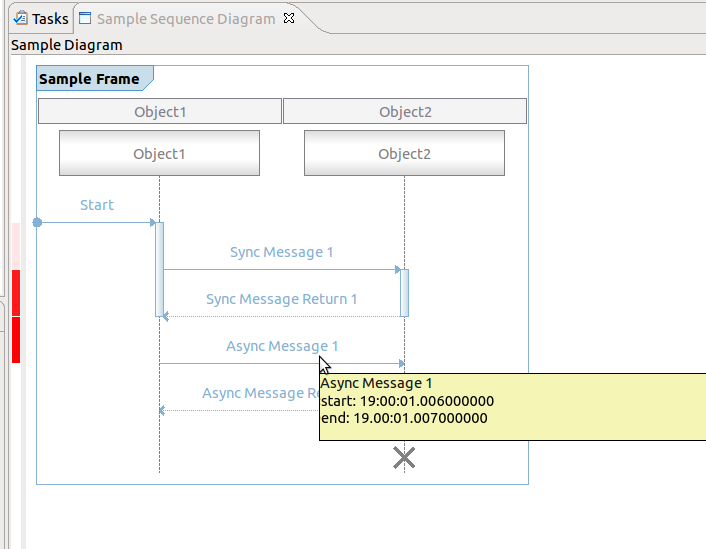
By hovering over a message it will show the time information in the appearing tooltip. For each SyncMessage it shows its time occurrence and for each AsyncMessage it shows the start and end time.
To see the time elapsed between 2 messages, select one message and hover over a second message. A tooltip will show with the delta in time. Note if the second message is before the first then a negative delta is displayed. Note that for
AsyncMessage the end time is used for the delta calculation.

The Sequence Diagram View comes with default coolbar and menu items. By default, each sequence diagram shows the following actions:
The following chapters describe how to use all supported provider interfaces.
For scalability reasons, the paging provider interfaces exists to limit the number of messages displayed in the Sequence Diagram View at a time. For that, two interfaces exist, the basic paging provider and the advanced paging provider. When using the basic paging interface, actions for traversing page by page through the sequence diagram of a trace will be provided.
To use the basic paging provider, first the interface methods of the
ISDPagingProvider have to be implemented by a class. (i.e.
hasNextPage(),
hasPrevPage(),
nextPage(),
prevPage(),
firstPage() and
endPage(). Typically, this is implemented in the loader class. Secondly, the provider has to be set in the Sequence Diagram View. This will be done in the
setViewer() method of the loader class. Lastly, the paging provider has to be removed from the view, when the
dispose() method of the loader class is called.
public class SampleLoader implements IUml2SDLoader, ISDPagingProvider {
    //...
    private int page = 0;

    @Override
    public void dispose() {
        if (fSdView != null) {
            fSdView.resetProviders();
        }
    }

    @Override
    public void setViewer(SDView arg0) {
        fSdView = arg0;
        fSdView.setSDPagingProvider(this);
        createFrame();
    }

    private void createSecondFrame() {
        Frame testFrame = new Frame();
        testFrame.setName("SecondFrame");
        Lifeline lifeline = new Lifeline();
        lifeline.setName("LifeLine 0");
        testFrame.addLifeLine(lifeline);
        lifeline = new Lifeline();
        lifeline.setName("LifeLine 1");
        testFrame.addLifeLine(lifeline);
        for (int i = 1; i < 5; i++) {
            SyncMessage message = new SyncMessage();
            message.autoSetStartLifeline(testFrame.getLifeline(0));
            message.autoSetEndLifeline(testFrame.getLifeline(0));
            message.setName((new StringBuilder("Message ")).append(i).toString());
            testFrame.addMessage(message);

            SyncMessageReturn messageReturn = new SyncMessageReturn();
            messageReturn.autoSetStartLifeline(testFrame.getLifeline(0));
            messageReturn.autoSetEndLifeline(testFrame.getLifeline(0));

            testFrame.addMessage(messageReturn);
            messageReturn.setName((new StringBuilder("Message return ")).append(i).toString());
            ExecutionOccurrence occ = new ExecutionOccurrence();
            occ.setStartOccurrence(testFrame.getSyncMessage(i - 1).getEventOccurrence());
            occ.setEndOccurrence(testFrame.getSyncMessageReturn(i - 1).getEventOccurrence());
            testFrame.getLifeline(0).addExecution(occ);
        }
        fSdView.setFrame(testFrame);
    }

    @Override
    public boolean hasNextPage() {
        return page == 0;
    }

    @Override
    public boolean hasPrevPage() {
        return page == 1;
    }

    @Override
    public void nextPage() {
        page = 1;
        createSecondFrame();
    }

    @Override
    public void prevPage() {
        page = 0;
        createFrame();
    }

    @Override
    public void firstPage() {
        page = 0;
        createFrame();
    }

    @Override
    public void lastPage() {
        page = 1;
        createSecondFrame();
    }
    //...
}
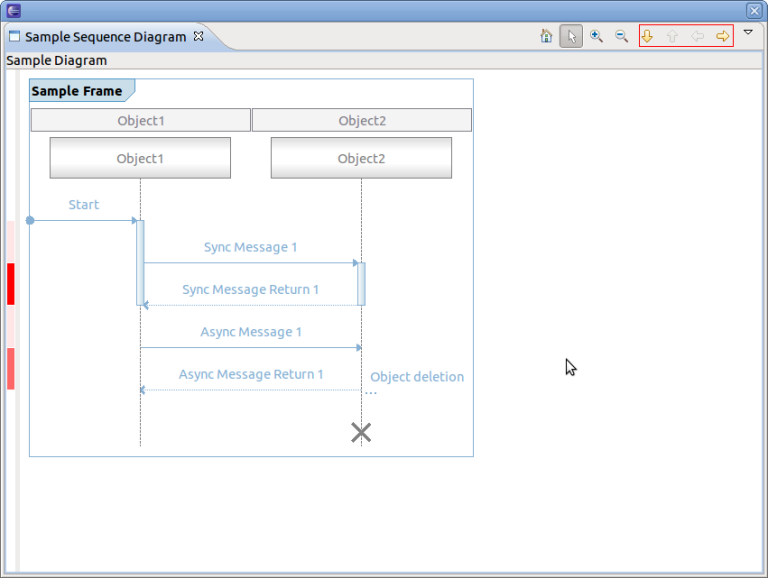
When running the example application, new actions will be shown in the coolbar and the coolbar menu.
To use the advanced paging provider, the interface
ISDAdvancePagingProvider has to be implemented. It extends the basic paging provider. The methods
currentPage(),
pagesCount() and
pageNumberChanged() have to be added.
For finding nodes in a sequence diagram two interfaces exists. One for basic finding and one for extended finding. The basic find comes with a dialog box for entering find criteria as regular expressions. This find criteria can be used to execute the find. Find criteria a persisted in the Eclipse workspace.
For the extended find provider interface a
org.eclipse.jface.action.Action class has to be provided. The actual find handling has to be implemented and triggered by the action.
Only on at a time can be active. If the extended find provder is defined it obsoletes the basic find provider.
To use the basic find provider, first the interface methods of the
ISDFindProvider have to be implemented by a class. Typically, this is implemented in the loader class. Add the ISDFindProvider to the list of implemented interfaces, implement the methods
find() and
cancel() and set the provider in the
setViewer() method as well as remove the provider in the
dispose() method of the loader class. Please note that the
ISDFindProvider extends the interface
ISDGraphNodeSupporter which methods (
isNodeSupported() and
getNodeName()) have to be implemented, too. The following shows an example implementation. Please note that only search for lifelines and SynchMessage are supported. The find itself will always find only the first occurrence the pattern to match.
public class SampleLoader implements IUml2SDLoader, ISDPagingProvider, ISDFindProvider {

    //...
    @Override
    public void dispose() {
        if (fSdView != null) {
            fSdView.resetProviders();
        }
    }

    @Override
    public void setViewer(SDView arg0) {
        fSdView = arg0;
        fSdView.setSDPagingProvider(this);
        fSdView.setSDFindProvider(this);
        createFrame();
    }

    @Override
    public boolean isNodeSupported(int nodeType) {
        switch (nodeType) {
        case ISDGraphNodeSupporter.LIFELINE:
        case ISDGraphNodeSupporter.SYNCMESSAGE:
            return true;

        default:
            break;
        }
        return false;
    }

    @Override
    public String getNodeName(int nodeType, String loaderClassName) {
        switch (nodeType) {
        case ISDGraphNodeSupporter.LIFELINE:
            return "Lifeline";
        case ISDGraphNodeSupporter.SYNCMESSAGE:
            return "Sync Message";
        }
        return "";
    }

    @Override
    public boolean find(Criteria criteria) {
        Frame frame = fSdView.getFrame();
        if (criteria.isLifeLineSelected()) {
            for (int i = 0; i < frame.lifeLinesCount(); i++) {
                if (criteria.matches(frame.getLifeline(i).getName())) {
                    fSdView.getSDWidget().moveTo(frame.getLifeline(i));
                    return true;
                }
            }
        }
        if (criteria.isSyncMessageSelected()) {
            for (int i = 0; i < frame.syncMessageCount(); i++) {
                if (criteria.matches(frame.getSyncMessage(i).getName())) {
                    fSdView.getSDWidget().moveTo(frame.getSyncMessage(i));
                    return true;
                }
            }
        }
        return false;
    }

    @Override
    public void cancel() {
        // reset find parameters
    }
    //...
}
When running the example application, the find action will be shown in the coolbar and the coolbar menu.
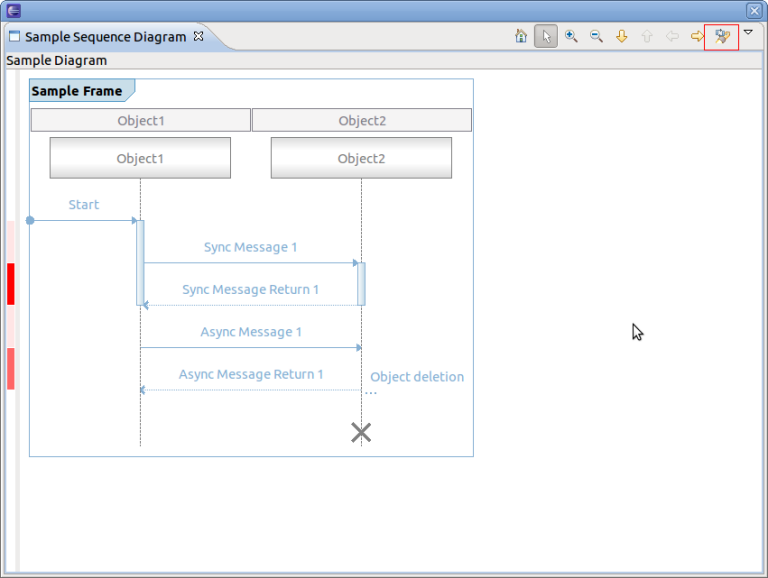
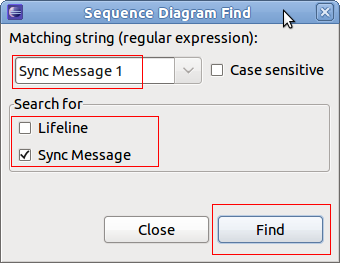
To find a sequence diagram node press on the find button of the coolbar (see above). A new dialog box will open. Enter a regular expression in the
Matching String text box, select the node types (e.g. Sync Message) and press
Find. If found the corresponding node will be selected. If not found the dialog box will indicate not found.
Note that the find dialog will be opened by typing the key shortcut CRTL+F.
For filtering of sequence diagram elements two interfaces exist. One basic for filtering and one for extended filtering. The basic filtering comes with two dialog for entering filter criteria as regular expressions and one for selecting the filter to be used. Multiple filters can be active at a time. Filter criteria are persisted in the Eclipse workspace.
To use the basic filter provider, first the interface method of the
ISDFilterProvider has to be implemented by a class. Typically, this is implemented in the loader class. Add the
ISDFilterProvider to the list of implemented interfaces, implement the method
filter()and set the provider in the
setViewer() method as well as remove the provider in the
dispose() method of the loader class. Please note that the
ISDFindProvider extends the interface
ISDGraphNodeSupporter which methods (
isNodeSupported() and
getNodeName()) have to be implemented, too.
Note that no example implementation of
filter() is provided.
public class SampleLoader implements IUml2SDLoader, ISDPagingProvider, ISDFindProvider, ISDFilterProvider {

    //...
    @Override
    public void dispose() {
        if (fSdView != null) {
            fSdView.resetProviders();
        }
    }

    @Override
    public void setViewer(SDView arg0) {
        fSdView = arg0;
        fSdView.setSDPagingProvider(this);
        fSdView.setSDFindProvider(this);
        fSdView.setSDFilterProvider(this);
        createFrame();
    }

    @Override
    public boolean filter(List<FilterCriteria> list) {
        return false;
    }
    //...
}
When running the example application, the filter action will be shown in the coolbar menu.
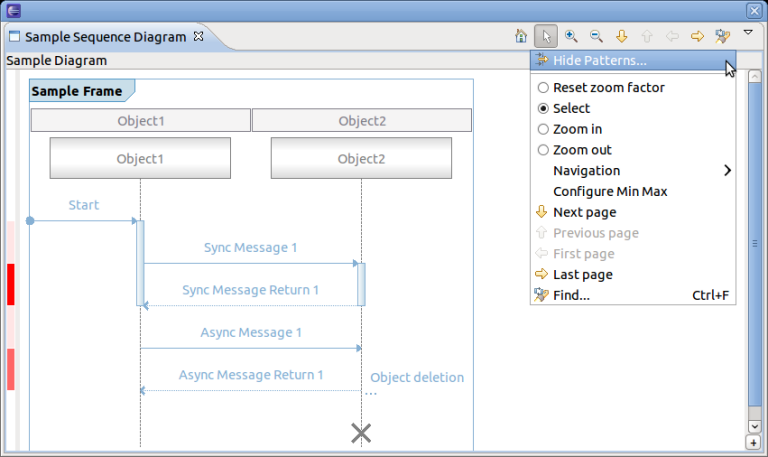
To filter select the
Hide Patterns... of the coolbar menu. A new dialog box will open.
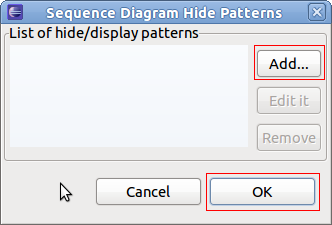
To Add a new filter press
Add.... A new dialog box will open. Enter a regular expression in the
Matching String text box, select the node types (e.g. Sync Message) and press
Create'.
Now back at the Hide Pattern dialog. Select one or more filter and select OK.
To use the extended filter provider, the interface ISDExtendedFilterProvider has to be implemented. It will provide a org.eclipse.jface.action.Action class containing the actual filter handling and filter algorithm.
The extended action bar provider can be used to add customized actions to the Sequence Diagram View.
To use the extended action bar provider, first the interface method of the interface
ISDExtendedActionBarProvider has to be implemented by a class. Typically, this is implemented in the loader class. Add the
ISDExtendedActionBarProvider to the list of implemented interfaces, implement the method
supplementCoolbarContent() and set the provider in the
setViewer() method as well as remove the provider in the
dispose() method of the loader class.
public class SampleLoader implements IUml2SDLoader, ISDPagingProvider, ISDFindProvider, ISDFilterProvider, ISDExtendedActionBarProvider {
    //...

    @Override
    public void dispose() {
        if (fSdView != null) {
            fSdView.resetProviders();
        }
    }

    @Override
    public void setViewer(SDView arg0) {
        fSdView = arg0;
        fSdView.setSDPagingProvider(this);
        fSdView.setSDFindProvider(this);
        fSdView.setSDFilterProvider(this);
        fSdView.setSDExtendedActionBarProvider(this);
        createFrame();
    }

    @Override
    public void supplementCoolbarContent(IActionBars iactionbars) {
        Action action = new Action("Refresh") {
            @Override
            public void run() {
                System.out.println("Refreshing...");
            }
        };
        iactionbars.getMenuManager().add(action);
        iactionbars.getToolBarManager().add(action);
    }
    //...
}
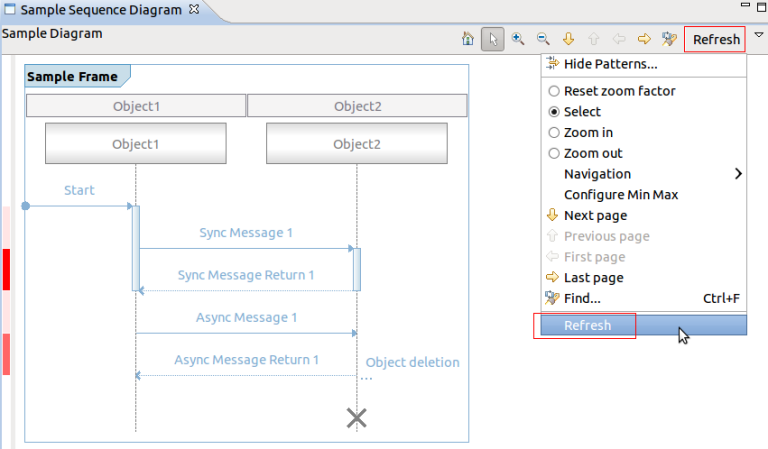
When running the example application, all new actions will be added to the coolbar and coolbar menu according to the implementation of
supplementCoolbarContent()
.
For the example above the coolbar and coolbar menu will look as follows.
This interface can be used to provide property information. A property provider which returns an
IPropertyPageSheet (see
org.eclipse.ui.views) has to be implemented and set in the Sequence Diagram View.
To use the property provider, first the interface method of the ISDPropertiesProvider has to be implemented by a class. Typically, this is implemented in the loader class. Add the ISDPropertiesProvider to the list of implemented interfaces, implement the method getPropertySheetEntry() and set the provider in the setViewer() method as well as remove the provider in the dispose() method of the loader class. Please note that no example is provided here.
Please refer to the following Eclipse articles for more information about properties and tabed properties.
This interface can be used to define a provider which responsibility is to collapse two selected lifelines. This can be used to hide a pair of lifelines.
To use the collapse provider, first the interface method of the ISDCollapseProvider has to be implemented by a class. Typically, this is implemented in the loader class. Add the ISDCollapseProvider to the list of implemented interfaces, implement the method collapseTwoLifelines() and set the provider in the setViewer() method as well as remove the provider in the dispose() method of the loader class. Please note that no example is provided here.
The Sequence Diagram View comes with a build in selection provider service. To this service listeners can be added. To use the selection provider service, the interface ISelectionListener of plug-in org.eclipse.ui has to implemented. Typically this is implemented in loader class. Firstly, add the ISelectionListener interface to the list of implemented interfaces, implement the method selectionChanged() and set the listener in method setViewer() as well as remove the listener in the dispose() method of the loader class.
public class SampleLoader implements IUml2SDLoader, ISDPagingProvider, ISDFindProvider, ISDFilterProvider, ISDExtendedActionBarProvider, ISelectionListener {

    //...
    @Override
    public void dispose() {
        if (fSdView != null) {
            PlatformUI.getWorkbench().getActiveWorkbenchWindow().getSelectionService().removePostSelectionListener(this);
            fSdView.resetProviders();
        }
    }

    @Override
    public String getTitleString() {
        return "Sample Diagram";
    }

    @Override
    public void setViewer(SDView arg0) {
        fSdView = arg0;
        PlatformUI.getWorkbench().getActiveWorkbenchWindow().getSelectionService().addPostSelectionListener(this);
        fSdView.setSDPagingProvider(this);
        fSdView.setSDFindProvider(this);
        fSdView.setSDFilterProvider(this);
        fSdView.setSDExtendedActionBarProvider(this);

        createFrame();
    }

    @Override
    public void selectionChanged(IWorkbenchPart part, ISelection selection) {
        ISelection sel = PlatformUI.getWorkbench().getActiveWorkbenchWindow().getSelectionService().getSelection();
        if (sel != null && (sel instanceof StructuredSelection)) {
            StructuredSelection stSel = (StructuredSelection) sel;
            if (stSel.getFirstElement() instanceof BaseMessage) {
                BaseMessage syncMsg = ((BaseMessage) stSel.getFirstElement());
                System.out.println("Message '" + syncMsg.getName() + "' selected.");
            }
        }
    }

    //...
}
To print a the whole sequence diagram or only parts of it, select the Sequence Diagram View and select
File -> Print... or type the key combination
CTRL+P. A new print dialog will open.
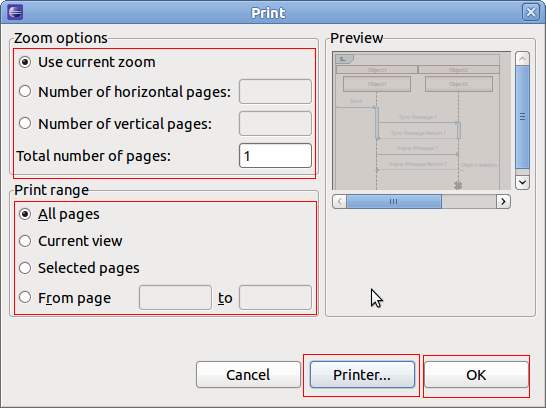
Fill in all the relevant information, select Printer... to choose the printer and the press OK.
A Sequence Diagram View definition can be used with multiple sequence diagram loaders. However, the active loader to be used when opening the view has to be set. For this define an Eclipse action or command and assign the current loader to the view. Here is a code snippet for that:
public class OpenSDView extends AbstractHandler {
    @Override
    public Object execute(ExecutionEvent event) throws ExecutionException {
        try {
            IWorkbenchPage persp = TmfUiPlugin.getDefault().getWorkbench().getActiveWorkbenchWindow().getActivePage();
            SDView view = (SDView) persp.showView("org.eclipse.linuxtools.ust.examples.ui.componentinteraction");
            LoadersManager.getLoadersManager().createLoader("org.eclipse.tracecompass.tmf.ui.views.uml2sd.impl.TmfUml2SDSyncLoader", view);
        } catch (PartInitException e) {
            throw new ExecutionException("PartInitException caught: ", e);
        }
        return null;
 }
}
Use the following link to download the source code of the tutorial Plug-in of Tutorial.
In the previous sections the Sequence Diagram Framework has been described and a tutorial was provided. In the following sections the integration of the Sequence Diagram Framework with other features of TMF will be described. Together it is a powerful framework to analyze and visualize content of traces. The integration is explained using the reference implementation of a UML2 sequence diagram loader which part of the TMF UI delivery. The reference implementation can be used as is, can be sub-classed or simply be an example for other sequence diagram loaders to be implemented.
A Sequence Diagram View Extension is defined in the plug-in TMF UI as well as a uml2SDLoader Extension with the reference loader.
Besides the default features of the Sequence Diagram Framework, the reference implementation uses the following additional features:
The reference loader implements the interface ISDAdvancedPagingProvider interface. Please refer to section Using the Paging Provider Interface for more details about the advanced paging feature.
The reference loader implements the interface ISDFindProvider interface. The user can search for Lifelines and Interactions. The find is done across pages. If the expression to match is not on the current page a new thread is started to search on other pages. If expression is found the corresponding page is shown as well as the searched item is displayed. If not found then a message is displayed in the Progress View of Eclipse. Please refer to section Using the Find Provider Interface for more details about the basic find feature.
The reference loader implements the interface ISDFilterProvider interface. The user can filter on Lifelines and Interactions. Please refer to section Using the Filter Provider Interface for more details about the basic filter feature.
The reference loader implements the interface ISelectionListener interface. When an interaction is selected a TmfTimeSynchSignal is broadcast (see TMF Signal Framework). Please also refer to section Using the Selection Provider Service for more details about the selection service and .
The reference implementation uses the following features of TMF:
The reference loader uses TMF Experiments to access traces and to request data from the traces.
The reference loader use the TMF Event Request Framework to request events from the experiment and its traces.
When opening a trace (which is triggered by signal TmfTraceSelectedSignal) or when opening the Sequence Diagram View after a trace had been opened previously, a TMF background request is initiated to index the trace and to fill in the first page of the sequence diagram. The purpose of the indexing is to store time ranges for pages with 10000 messages per page. This allows quickly to move to certain pages in a trace without having to re-parse from the beginning. The request is called indexing request.
When switching pages, a TMF foreground event request is initiated to retrieve the corresponding events from the experiment. It uses the time range stored in the index for the respective page.
A third type of event request is issued for finding specific data across pages.
The reference loader extends the class TmfComponent. By doing that the loader is registered as a TMF signal handler for sending and receiving TMF signals. The loader implements signal handlers for the following TMF signals:
This signal indicates that a trace or experiment was selected. When receiving this signal the indexing request is initiated and the first page is displayed after receiving the relevant information.
This signal indicates that a trace or experiment was closed. When receiving this signal the loader resets its data and a blank page is loaded in the Sequence Diagram View.
This signal is used to indicate that a new time or time range has been selected. It contains a begin and end time. If a single time is selected then the begin and end time are the same. When receiving this signal the corresponding message matching the begin time is selected in the Sequence Diagram View. If necessary, the page is changed.
This signal indicates that a new time range is in focus. When receiving this signal the loader loads the page which corresponds to the start time of the time range signal. The message with the start time will be in focus.
Besides acting on receiving signals, the reference loader is also sending signals. A TmfTimeSynchSignal is broadcasted with the timestamp of the message which was selected in the Sequence Diagram View. TmfRangeSynchSignal is sent when a page is changed in the Sequence Diagram View. The start timestamp of the time range sent is the timestamp of the first message. The end timestamp sent is the timestamp of the first message plus the current time range window. The current time range window is the time window that was indicated in the last received TmfRangeSynchSignal.
The reference implementation is able to analyze traces from a single component that traces the interaction with other components. For example, a server node could have trace information about its interaction with client nodes. The server node could be traced and then analyzed using TMF and the Sequence Diagram Framework of TMF could used to visualize the interactions with the client nodes.
Note that combined traces of multiple components that contain the trace information about the same interactions are not supported in the reference implementation!
The reference implementation in class TmfUml2SDSyncLoader in package org.eclipse.tracecompass.tmf.ui.views.uml2sd.impl analyzes events from type ITmfEvent and creates events type ITmfSyncSequenceDiagramEvent if the ITmfEvent contains all relevant information information. The parsing algorithm looks like as follows:
    /**
     * @param tmfEvent Event to parse for sequence diagram event details
     * @return sequence diagram event if details are available else null
     */
    protected ITmfSyncSequenceDiagramEvent getSequenceDiagramEvent(ITmfEvent tmfEvent){
        //type = .*RECEIVE.* or .*SEND.*
        //content = sender:<sender name>:receiver:<receiver name>,signal:<signal name>
        String eventType = tmfEvent.getType().toString();
        if (eventType.contains(Messages.TmfUml2SDSyncLoader_EventTypeSend) || eventType.contains(Messages.TmfUml2SDSyncLoader_EventTypeReceive)) {
            Object sender = tmfEvent.getContent().getField(Messages.TmfUml2SDSyncLoader_FieldSender);
            Object receiver = tmfEvent.getContent().getField(Messages.TmfUml2SDSyncLoader_FieldReceiver);
            Object name = tmfEvent.getContent().getField(Messages.TmfUml2SDSyncLoader_FieldSignal);
            if ((sender instanceof ITmfEventField) && (receiver instanceof ITmfEventField) && (name instanceof ITmfEventField)) {
                ITmfSyncSequenceDiagramEvent sdEvent = new TmfSyncSequenceDiagramEvent(tmfEvent,
                                ((ITmfEventField) sender).getValue().toString(),
                                ((ITmfEventField) receiver).getValue().toString(),
                                ((ITmfEventField) name).getValue().toString());

                return sdEvent;
            }
        }
        return null;
    }
The analysis looks for event type Strings containing SEND and RECEIVE. If event type matches these key words, the analyzer will look for strings sender, receiver and signal in the event fields of type ITmfEventField. If all the data is found a sequence diagram event can be created using this information. Note that Sync Messages are assumed, which means start and end time are the same.
An example CTF (Common Trace Format) trace is provided that contains trace events with sequence diagram information. To download the reference trace, use the following link: Reference Trace.
Run an Eclipse application with Trace Compass 0.1.0 or later installed. To open the Reference Sequence Diagram View, select
Windows -> Show View -> Other... -> Tracing -> Sequence Diagram
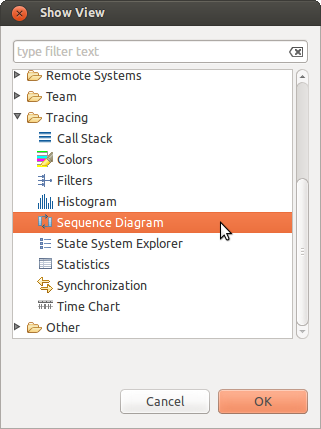
A blank Sequence Diagram View will open.
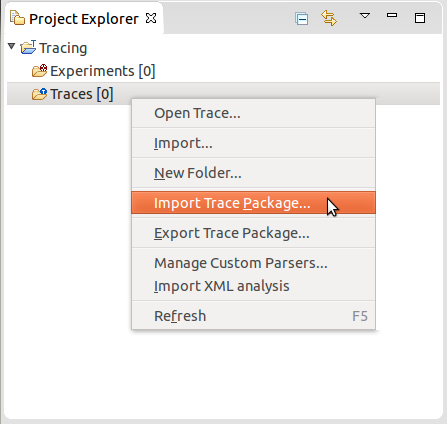
Then import the reference trace to the
Project Explorer using the
Import Trace Package... menu option.
Next, open the trace by double-clicking on the trace element in the
Project Explorer. The trace will be opened and the Sequence Diagram view will be filled.
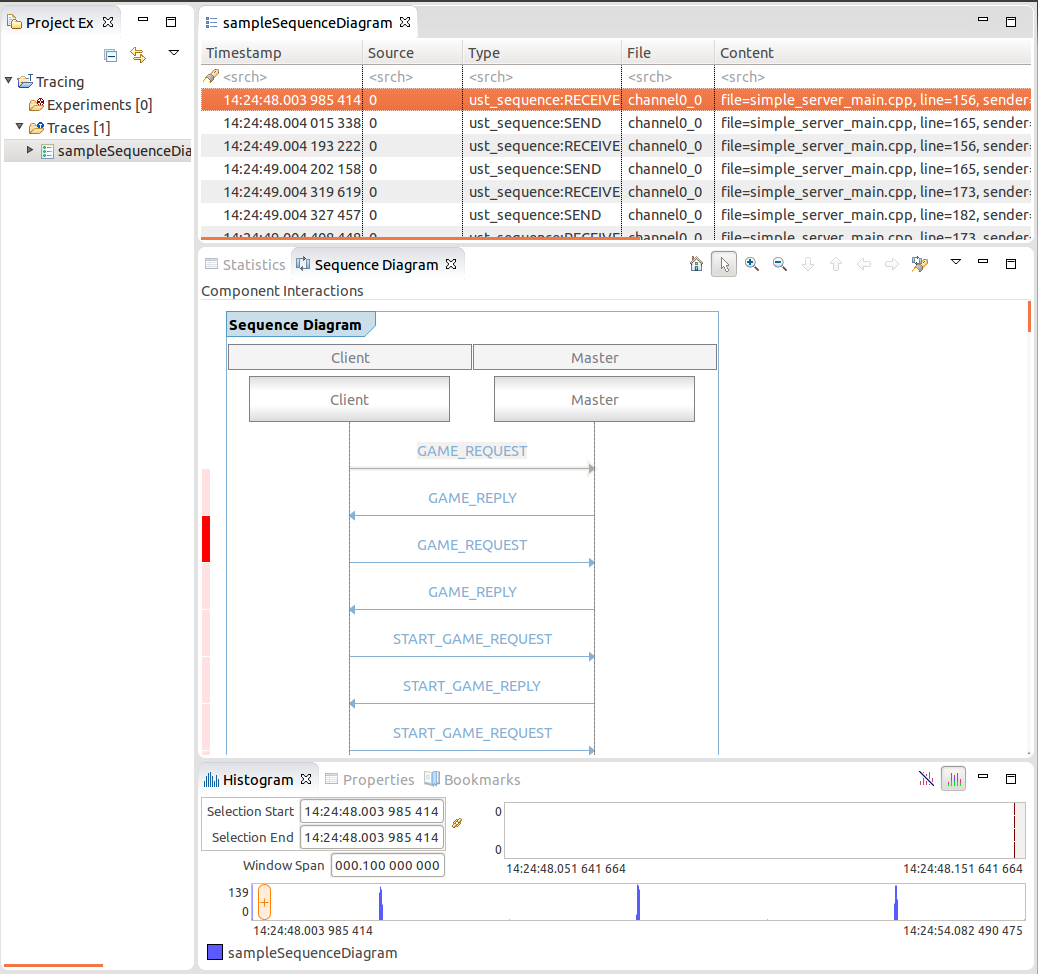
Now the reference implementation can be explored. To demonstrate the view features try the following things:
In some case it might be necessary to change the implementation of the analysis of each TmfEvent for the generation of Sequence Diagram Events. For that just extend the class TmfUml2SDSyncLoader and overwrite the method protected ITmfSyncSequenceDiagramEvent getSequenceDiagramEvent(ITmfEvent tmfEvent) with your own implementation.
|
|

|
|
| Generic State System | CTF Parser |