It is recommended to install the RAP Tooling into your IDE. You can either download the Eclipse package named “Eclipse for RAP and RCP Developers” or install the RAP Tooling into your Eclipse from the Eclipse repositories. If you read this article inside Eclipse, then you obviously have the RAP Tooling installed already.
To develop RAP applications, you have to install a RAP target platform. The target platform contains the bundles that all your workspace projects are compiled against. You can check your current target in the Eclipse Preferences under Plug-in Development > Target Platform. The RAP Tooling can assist you to install a RAP target platform. On the Welcome page (Help > Welcome) navigate to the RAP page (Overview > Rich Ajax Platform) and select Install RAP Target Platform.
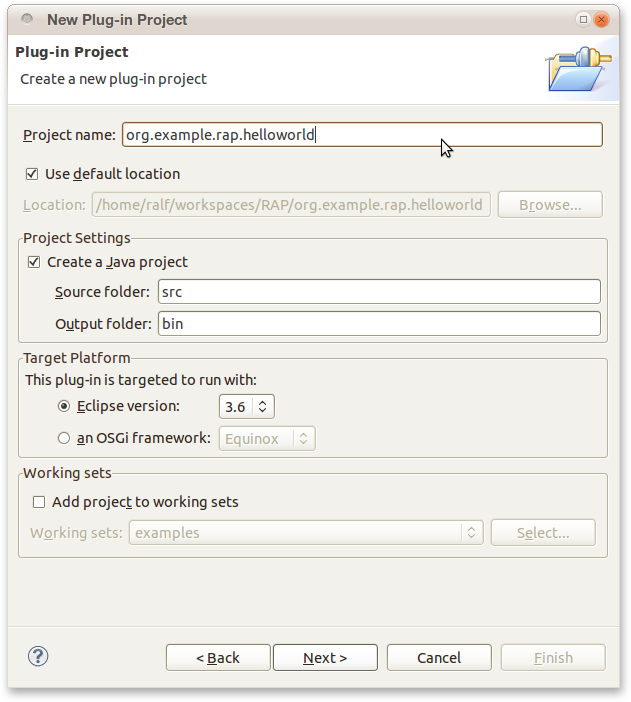
First we need a project for our application.
From the menu, select File > New > Project.
When the New Project wizard appears select
Plug-in Project from the section
Plug-in Development.
Let's call the plug-in org.example.rap.helloworld.

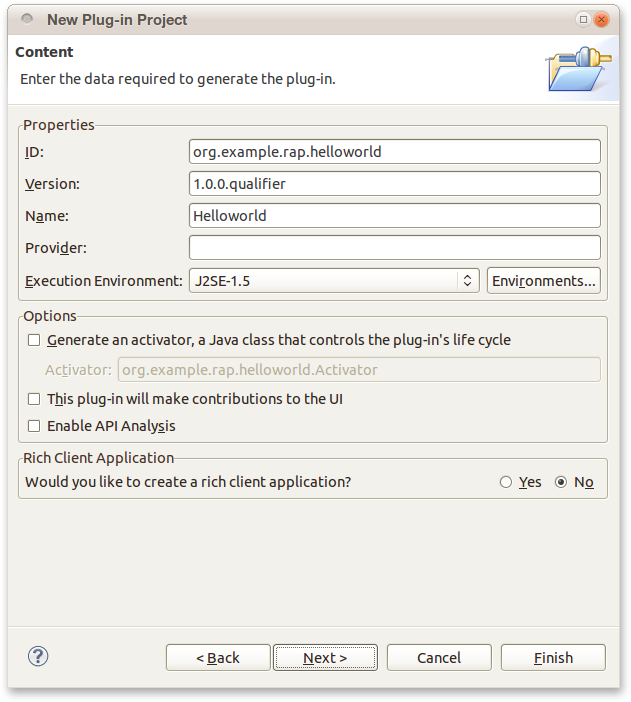
On the second page of the wizard, disable the options Generate an activator, … and This plug-in will make contributions to the UI. The first one would create a bundle activator, but we don't need that now. The latter would add dependencies for RCP apps, but they don't fit for RAP.

Now we add a dependency to the org.eclipse.rap.ui plug-in.
This bundle is the RAP equivalent of org.eclipse.ui.
It “re-exports” all bundles you need for developing Eclipse applications, including SWT and
JFace.
Later, you can (and you should) be more specific on your dependencies, but for now, this is the
easiest way.
To add this dependency, open the project's bundle manifest file
META-INF/MANIFEST.MF.
In the Plug-in Manifest Editor, go to the Dependencies page.
Add org.eclipse.rap.ui to the list of Required Plug-ins
and save.
Before creating any Java code you should create a package.
The main package of the bundle should always match with the bundle id, to avoid split packages.
Therefore, name the package org.example.rap.helloworld.
Your application needs an entrypoint, a method that is called by the framework when a user
starts the application.
To do so, we need a class that implements the interface IEntryPoint.
Alternatively, it is also possible to implement the Eclipse-specific interface
IApplication.
Let's start with the more general IEntryPoint.
We create a class named EntryPoint that implements IEntryPoint.
In the method createUI, we create some SWT code.
You can generate the skeleton of this code using an SWT template (type main and hit
Ctrl+Space, then select the template named mainloop).
In the example below, we added a Button with the text “Hello world!”:
  public class EntryPoint implements IEntryPoint {

    public int createUI() {
      Display display = new Display();
      Shell shell = new Shell( display );
      shell.setLayout( new GridLayout( 1, false ) );

      Button button = new Button( shell, SWT.PUSH );
      button.setText( "Hello world!" );

      shell.pack();
      shell.open();
      while( !shell.isDisposed() ) {
        if( !display.readAndDispatch() ) {
          display.sleep();
        }
      }
      display.dispose();
      return 0;
    }
  }
To make RAP aware of this entrypoint, it has to be registered with an extension point.
In the Plug-in Manifest Editor, go to the Extensions tab
and create a new extension for the extension point org.eclipse.rap.ui.entrypoint.
Select the created entrypoint class as value for the class attribute.
Also specify a concise value for the parameter attribute such as myapp.
We'll need this parameter later to access the application.
That's it, we are now ready to run the application. Here's the short version: Run > Run configurations…, create a new RWT launch configuration, select your project and entrypoint class and press Run. A browser view should open up soon afterwards and show your running application. More on launching RAP applications in the chapter Launching RAP Applications.